Introduction
Amazon ads don’t just compete on keywords; they compete on intent interpretation. A lesser-known reality is that two shoppers can type the same phrase and still be in completely different buying states.
That’s why knowing how to find negative keywords for Amazon FBA matters so much. It fully prevents intent mismatch, so your ads appear only when a purchase is actually possible.
How To Find Negative Keywords For Amazon FBA: Turn Wasted Clicks Into Higher Conversions
Amazon ads don’t just compete on keywords; they compete on intent interpretation. A lesser-known reality is that two shoppers can type the same phrase and still be in completely different buying states.
That’s why knowing how to find negative keywords for Amazon FBA matters so much. It fully prevents intent mismatch, so your ads appear only when a purchase is actually possible.
Master Negative Keyword Research: 6 Proven Methods That Cut Wasted Spend
Identifying the right negative keywords requires a systematic approach combining manual analysis with automated tools. Each method below targets different sources of wasted ad spend, and when used together, they create a comprehensive optimization framework.
Let's start with the most critical method that every FBA seller should implement first.
Method 1: Mine Your Search Term Reports (Most Important)

Your search term report is the goldmine for negative keyword discovery. It shows exactly what shoppers typed before clicking your ads, revealing which terms drain your budget without generating sales.
Here's your step-by-step process:
- Log in to the Amazon Advertising Console and navigate to Campaign Manager
- Select the campaign you want to analyze and click the "Search term report" tab
- Set your date range to 30-60 days minimum for statistical relevance
- Download the report as Excel/CSV and focus on these columns: Customer Search Term, Clicks, Orders, Spend, and ACOS
- Apply filters to identify problem terms: 20+ clicks with zero orders, ACOS exceeding 3x your target, or $20+ spend without conversions
Once you've filtered the data, manually review each flagged term and ask: "Would someone searching this actually want my product?"
Look for competitor brand names, wrong product categories, price modifiers like "cheap" or "discount," informational terms like "how to" or "review," and incorrect specifications.
Here's how this works: If you're selling premium leather wallets at $49.99 and see "cheap leather wallet" with 45 clicks, $22.50 spend, and zero orders, add "cheap" as a negative phrase match. Also flag terms like "vegan" (wrong material), "repair kit" (different product), and "ridge wallet" (competitor brand).
Pro Tip: Start with 50-100 negatives for your first optimization round. Don't overwhelm yourself; you can add more during weekly reviews as new data comes in.
Method 2: Use Amazon Brand Analytics Customer Search Terms Report
Brand Analytics shows the most popular search terms on Amazon, helping you identify high-traffic terms that attract the wrong audience. This requires Brand Registry enrollment but provides invaluable competitive intelligence.
Access and analyze the data:
- Log in to Seller Central and navigate to Brands → Brand Analytics
- Click "Amazon Search Terms Report" and download the last 90 days
- Focus on the "Search Frequency Rank" column; lower numbers indicate higher search volume
- Cross-reference high-volume terms with your actual conversion data from search term reports
- Identify terms ranking in the top 1 million searches that send you clicks but generate zero or minimal conversions
The key insight here is finding the gap between search popularity and your product's actual relevance. A term might be searched thousands of times monthly, but if it consistently fails to convert for your specific product, it's draining your budget.
Here's how this works: If you're selling women's wallets and notice "leather wallet men" ranks #5,432 (high volume) but generates 200 clicks, only 2 conversions, and 180% ACOS, you'd add "men," "mens," and "men's" as negative phrase matches to eliminate clicks from the wrong audience.
Method 3: Analyze Your Auto Campaign Targeting Segments
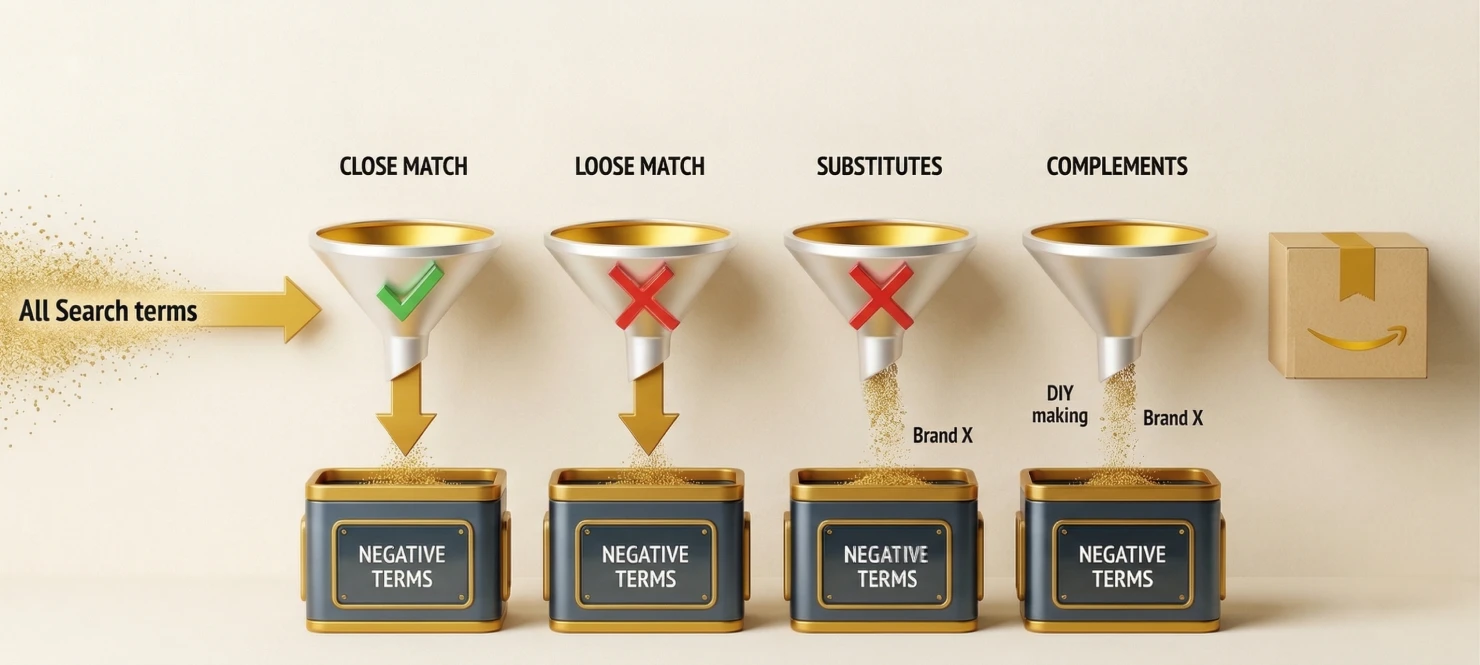
Amazon's automatic campaigns use four targeting types: Close Match, Loose Match, Substitutes, and Complements, each with different relevance levels. Loose Match and Substitutes often cast the widest net, generating the most irrelevant traffic.
Segment and optimize your data:
- In Campaign Manager, select your auto campaign and click "Search terms."
- Add the "Targeting" column to see which targeting type triggered each search term
- Download this segmented data and focus on Loose Match and Substitutes first
- Apply the same performance filters: clicks without conversions, excessive ACOS, and high spend
- Look for patterns in non-converting terms rather than adding individual keywords
Instead of playing whack-a-mole with individual terms, identify patterns. If all terms containing "DIY" fail to convert, add "DIY" as a negative phrase match. If competitor "Brand X" appears in multiple non-converting searches, block the entire brand.
Here's how this works: If your auto campaign's Loose Match shows terms like "leather wallet making kit," "leather wallet DIY," and "how to make leather wallet", all with 10+ clicks and zero conversions, add "DIY," "making," and "how to make" as negative phrase matches.
Method 4: Reverse-Engineer from Amazon's Search Bar Auto-Suggest
Amazon's auto-complete reveals what real customers are searching for, allowing you to proactively block irrelevant terms before wasting ad spend. This method is particularly powerful for new products without historical data.
Conduct systematic research:
- Open Amazon.com in an incognito browser (removes personal search history bias)
- Type your primary keyword slowly and note all auto-complete suggestions
- Look for suggestions that don't match your product: different sizes, materials, use cases, or competitor brands
- Test modifiers by adding terms like "cheap," "professional," or "commercial" to your keyword
- Create a spreadsheet documenting each variation and whether to add as a negative
Do this research for your top 10-20 target keywords to generate 100-200 negative keyword candidates within 2-3 hours.
Here's how this works: If you're selling premium cork yoga mats at $79.99, type "yoga mat" and you'll see suggestions like "yoga mat cheap," "yoga mat under 20," and "yoga mat bulk." For "cork yoga mat," you might find "cork yoga mat thin" and "cork yoga mat travel size."
Since you're selling thick, premium mats for home use, add "cheap," "under 20," "under 30," "bulk," "thin," and "travel" as negative phrase matches.
Pro Tip: This method works exceptionally well for preventing wasted spend on new products or when entering competitive categories where you need to immediately differentiate from low-price competitors.
Method 5: Mine Negative Reviews and Customer Questions

Your negative reviews reveal expectation mismatches, customers who bought your product expecting something different. These insights identify keywords that attract the wrong audience before they even click your ads.
Extract actionable insights:
- Read through all 1-3-star reviews on your product listing
- Look for complaint patterns like "I thought this was [X], but it's [Y]" or "Not suitable for [use case]."
- Review the Q&A section for repeated questions about capabilities you don't offer
- Document all wrong use cases, specifications, or comparisons to competitors
- Add these insights as negative phrase matches to prevent future mismatched expectations
This method does double duty: it improves your ACOS while reducing future negative reviews and return rates.
Here's how this works: If you're selling home-use resistance bands and see negative reviews mentioning "not strong enough for commercial gym," "broke during CrossFit," or "need professional grade," plus customer questions asking "can this handle 300 lbs?" (when your max is 150 lbs) or "is this for powerlifting?" (when it's designed for general fitness), add "commercial," "gym quality," "professional grade," "CrossFit," "powerlifting," and "heavy duty" as negatives to prevent both wasted ad spend and future negative reviews.
Method 6: Use Third-Party Amazon PPC Tools
Third-party tools accelerate negative keyword discovery by analyzing massive datasets and using AI to identify patterns you might miss manually. While not essential for sellers with smaller ad budgets, these tools become increasingly valuable as spend scales.
Tool-specific strategies:
- Helium 10 Cerebro: Run reverse ASIN lookups on competitors to find keywords they rank for that are irrelevant to your product
- Jungle Scout Keyword Scout: Filter by "Informational" keyword type to bulk-add research-phase searches that rarely convert
- Helium 10 Adtomic: Review AI-generated suggestions that automatically flag zero-conversion terms and high-ACOS keywords
- SellerApp PPC Analyzer: Export the "Wasted Spend" report showing search terms draining budget with no returns
- Perpetua: Enterprise-level AI that automatically suggests negatives weekly with projected savings for each term
Budget-Based Recommendations: For ad spend under $2,000/month, stick with free methods like search term reports. Between $2,000-$10,000/month, Helium 10 Diamond ($279/month) delivers ROI through Cerebro and Adtomic. Above $10,000/month, Perpetua ($695+/month) justifies its cost through time savings and automation. All sellers can test Jungle Scout's 7-day money-back guarantee to build an initial informational negative keyword list.
Pro Tip: Start free trials strategically across 3-4 weeks, extract all negative keyword suggestions, then cancel before billing if the ongoing cost doesn't justify your ad spend level.
With these six methods working together, you'll build a comprehensive negative keyword strategy that protects your budget and maximizes profitability.
Adding Negative Keywords To Campaigns: Your Complete Implementation Playbook
You've identified 100+ negative keywords draining your budget, but now comes the critical question: how do you actually add them to your campaigns? The implementation process is straightforward when you know exactly where to place negatives and which methods to use for different scenarios.

Understanding where to place negative keywords determines your campaign's efficiency and flexibility. Amazon offers two placement options, each serving different strategic purposes.
Key placement rules:
- Campaign-level: Blocks keywords across all ad groups in that campaign
- Ad group-level: Blocks keywords only within specific ad groups
- Use campaign-level for universal negatives like "cheap," competitor brands, or informational terms
- Use ad group-level for product-specific exclusions (like "men's" for women's products only)
Campaign-level negatives work best as your broad-stroke approach. If "wholesale" never makes sense for your premium brand, add it at the campaign level and forget about it.
Ad group-level negatives provide surgical precision when one product needs different exclusions than another within the same campaign.
Decision framework: Start with campaign-level for 80% of your negatives. Only use ad group-level targeting when targeting differences require it.
Bulk Upload: Adding Multiple Negatives At Once
For 20+ negative keywords, bulk upload saves hours compared to manual entry and reduces implementation errors.
Step-by-step process:
- Navigate to Campaign Manager and click the "Negative keywords" tab
- Select "Upload negative keywords" and download the template spreadsheet
- Fill columns: Campaign Name, Keyword Text, Match Type (Negative phrase or Negative exact)
- Leave Ad Group Name blank for campaign-level negatives
- Upload your completed file and review the preview before submitting
Pro tip: Maintain a master spreadsheet organized by categories (competitors, quality modifiers, informational terms). This becomes your reusable template for future campaigns, making bulk uploads take just 5 minutes instead of hours.
Single Keyword Addition: Quick Manual Method
For 1-5 negatives, manual addition is faster than creating spreadsheets. Navigate to your campaign, click "Negative keywords," select "Add negative keywords," choose campaign-level or ad group-level, enter your keyword without quotes, select match type, and click "Add."
Your negative keyword activates within 5-10 minutes and appears immediately in your dashboard.
Creating Reusable Negative Keyword Lists
Amazon's negative keyword lists are game-changers for managing multiple campaigns efficiently. Instead of adding the same 50 negatives to every new campaign, create one master list and apply it in seconds.
How to create and apply lists:
- Go to Campaign Manager and select "Negative keyword lists."
- Click "Create negative keyword list" and name it descriptively
- Add negative keywords one per line (no bulk upload needed here)
- Apply to campaigns by selecting the campaign, clicking "Negative keyword lists," and choosing your saved lists
Strategic lists to create: Universal negatives (cheap, free, DIY), competitor brands, informational terms (how to, review), product-specific exclusions.
Common Implementation Errors That Break Campaigns
Even experienced sellers make these critical mistakes that sabotage results.
Typos in campaign names during bulk upload cause negatives to fail silently. Amazon doesn't warn you; keywords simply don't apply. Always copy-paste campaign names from your dashboard.
Wrong match type selection leaves expensive loopholes. Using exact match when you meant phrase match allows variations through. Default to phrase match unless you need exact match precision.
Adding negatives to only one campaign type while forgetting auto campaigns still wastes money. Check all campaign types and add negatives consistently across manual, auto, and brand campaigns.
Over-negating without data kills reach unnecessarily. Every negative should have search term report proof: 20+ clicks with zero conversions minimum. Never add speculative negatives based on assumptions.
With proper implementation, you'll see wasted spend drop within 48 hours and ACOS improvements within 7-14 days.
Stop Paying for Clicks That Were Never Meant to Convert
Negative keywords are not a cleanup task; they’re a control system for buyer intent. When you consistently identify, validate, and apply them, your ads stop chasing curiosity clicks and start attracting shoppers who are ready to buy.
The result is cleaner traffic, stronger conversion rates, and more reliable sales velocity over time.
If you want help implementing this at scale, we do this every day at Olifant Digital. We’ll audit your campaigns, fix intent leaks, and align your ads with listings built to convert, so every click has a real chance to turn into revenue.