Introduction
If you take a few minutes to browse Amazon listings, you’ll start to notice that some listings stand out as being exceptionally detailed while others are, well, pretty unclear.
While you may be able to get a few sales with a subpar listing, you aren’t going to get far with building a lasting brand. To do that, you’ll need to optimize your listing.
In this article, we will walk you through everything you must know about Amazon listing optimization.
What Is Amazon Listing Optimization?
Amazon listing optimization is the process of testing and tweaking different pieces of your listing until it reaches its peak performance. Optimizing your Amazon listings is crucial for improving product visibility, ranking, and overall sales performance on the platform.
But considering the number of elements in each listing, it’s not a quick-fix process.
Some product listings need to be optimized for higher CTR (click-through rate) and others have no problem getting clicks but need optimization for higher conversion rate a.k.a sales.
No matter what you’re optimizing for, there are three things you must have nailed down.
Audience – Listing on Amazon without comprehensive knowledge about what your audience is looking for will make the process 10x harder. Defining your target audience is step one in the optimization.
Purpose – Why is your product better than all of the competitor products on the marketplace? With no shortage of options, your purpose gives you a direction for everything from how you write your description to what product images you include. Include your unique value proposition (if any) and attack your customer pain points.
Keywords – You have to figure out not only what your audience is entering in the search bar, but what keywords your listing can stand out for while you work on growing your sales. Amazon keywords play a vital role in listing optimization, as they directly impact your product’s discoverability and ranking on Amazon. Once you’ve ranked for less competitive keywords, you’ll move on to more widely searched terms and repeat the process. Conducting in depth keyword research helps you identify the best amazon keywords to target, ensuring your listing attracts more relevant traffic and improves organic ranking.
Not sure how to find your ideal keywords? Check our detailed Amazon keyword research guide.
Remember, you will have to optimize your product listing multiple times as your listing matures and your goals shift. Any time you update your images or keywords, you’re optimizing your Amazon product listing.

Audience – Listing on Amazon without comprehensive knowledge about what your audience is looking for will make the process 10x harder. Defining your target audience is step one in the optimization.
Purpose – Why is your product better than all of the competitor products on the marketplace? With no shortage of options, your purpose gives you a direction for everything from how you write your description to what product images you include. Include your unique value proposition (if any) and attack your customer pain points.
Keywords – You have to figure out not only what your audience is entering in the search bar, but what keywords your listing can stand out for while you work on growing your sales. Once you’ve ranked for less competitive keywords, you’ll move on to more widely searched terms and repeat the process.
Not sure how to find your ideal keywords? Check our detailed Amazon keyword research guide.
Remember, you will have to optimize your product listing multiple times as your listing matures and your goals shift. Any time you update your images or keywords, you’re optimizing your Amazon product listing.
How To List A New Product On Amazon

If you haven’t listed your product on Amazon yet, you’ll need to start there. Fortunately, Amazon makes adding new products easy.
Step 1: Sign in to your Seller Central Account and head to your dashboard.
Step 2: Head to the menu and click on “Inventory.”
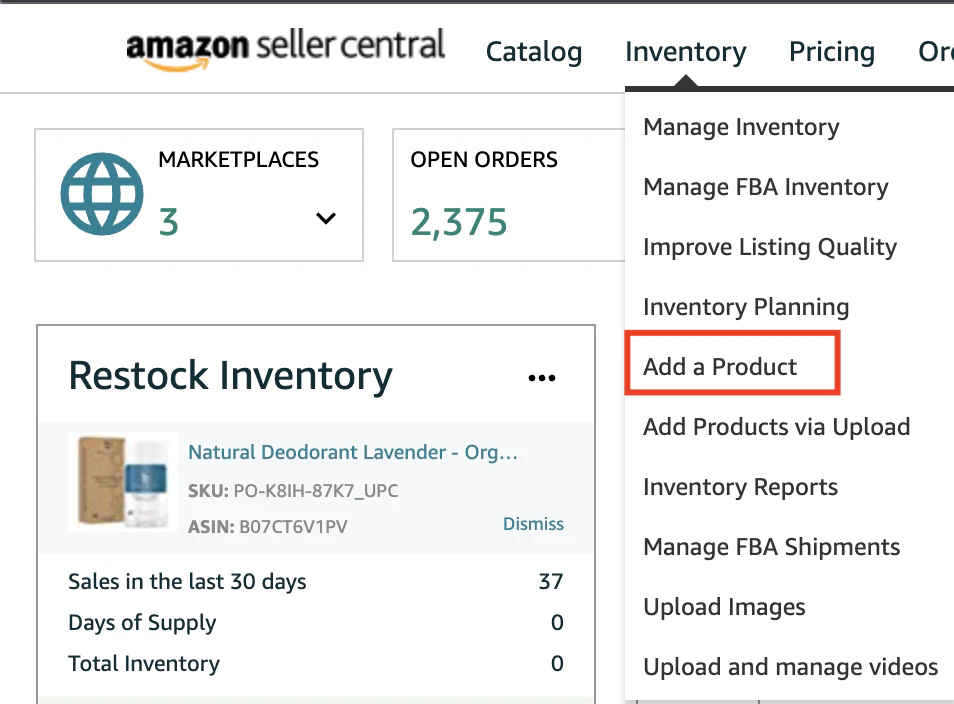
Step 3: Next, select “Add a Product” from the sub-menu.
Step 4: You’ll then be taken to a page where you can search for your item’s listing (if you’re a reseller) or add a new item. Click the text “I’m adding a product not sold on Amazon.”

Step 5: Then, choose the category and subcategory for your product. Your category can be listed under more than one category, but only choose more than one if it truly fits.

Step 6: You’ll update your listing by navigating through each tab, starting with “Variations.” The information you enter for your listing will decide how it is displayed to customers, and that’s what the rest of this article will cover. We’ll help you understand how to list your product to Amazon’s standards and look at strategies to increase performance.
Introduction to Amazon’s A9 Ranking Algorithm
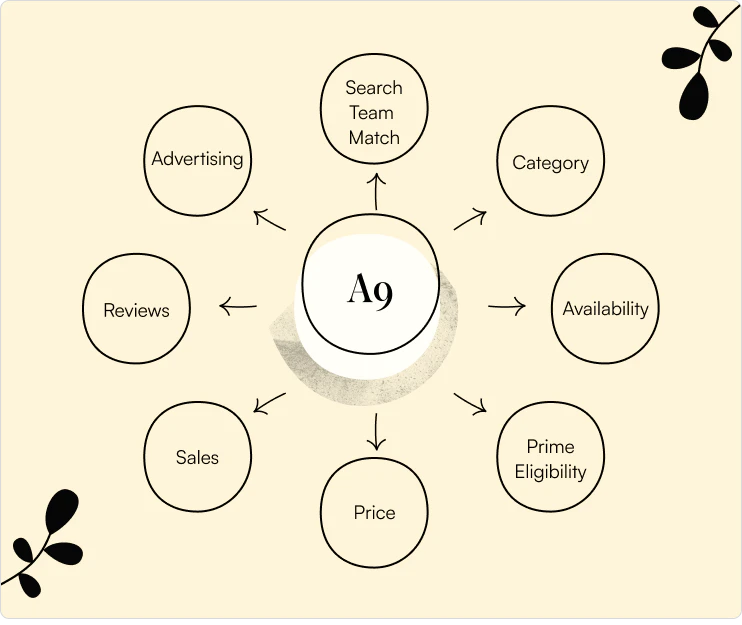
You might think you’re optimizing your product listing for your customers, and while you’re right, you’re also optimizing for A9.
So, what exactly is A9?
A9 is the official name given to Amazon’s current search algorithm. It’s the algorithm that decides where listings show in the search results. Amazon's algorithm evaluates search queries and amazon search behavior to determine product ranking, making it essential to optimize your listings for the terms and keywords buyers are actually using.
Let’s look at a few of the main components the algorithm uses in its decision process.
Search Term to Keyword Match
Search terms and keywords are similar, but they aren’t the same to Amazon. A search term is a query your customer uses to find products, and a keyword is the word or phrases you include in your listing to teach the algorithm about your product.
When it comes to Amazon SEO, a search term doesn’t have to match a keyword exactly for Amazon to show a listing in the search results.
For example, if a significant number of customers search for “photo frame” but then purchase an item with the keyword “picture frame” instead, the algorithm will learn to show that listing even though the keyword and search term isn’t an exact match.
Category
When you select a product category and subcategory, you can choose more than one. But don’t try to “hack” Amazon’s algorithm by choosing a less competitive category that isn’t hyper-relevant to your product.
For items that might fit in multiple categories and subcategories, Amazon adds an option to filter searches by department.
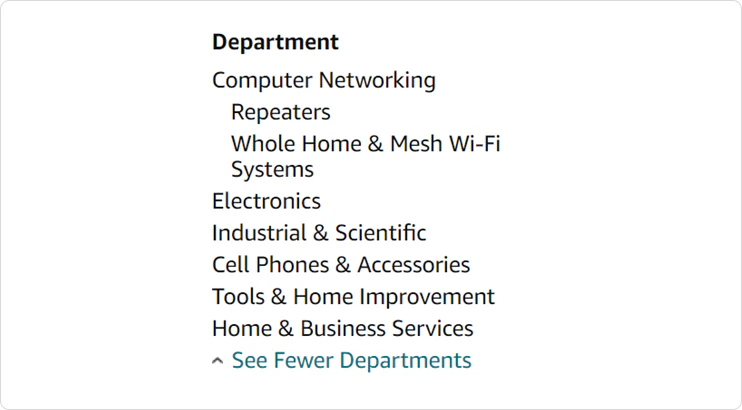
And for other items, you might notice that Amazon starts with “all” categories, but once you hit enter, the algorithm narrows the results to a specific category, like beauty. In this instance, if you choose an inaccurate category for your listing, your product won’t rank even if you’re using the best keywords.
Availability
Products that aren’t reliably stocked will be penalized by the algorithm. What good is a product customers love if they can’t get it half of the time?
Scarcity might be a way to drive sales off the marketplace, but on Amazon, pay attention to your inventory if you don’t want to damage your sales from organic search.
FBA/Prime Eligibility
There are two major reasons that Amazon cares about products enrolled in FBA.
1) Products enrolled in the FBA program are monitored so Amazon can verify a product’s availability.
2) Amazon ships products in FBA, so they’re automatically Prime eligible.
Bottom line: Amazon prefers to control inventory and shipping, and the algorithm reflects this.
Pricing

Amazon has become known for having a wide range of products at the most affordable prices. That’s not to say that high-end products don’t have their place, but new listings without a solid number of positive reviews will struggle if they are priced too high initially.
The algorithm appears to favor products with moderate pricing that falls within the average range of similar products, so don’t forget to look at product price during your competitor research.
Sales Numbers
Product listings with a high sales volume are the listings that continue to be shown at the top of the organic search results.
Higher sales velocity shows Amazon that the product meets the customers’ needs, and that’s the ultimate goal. Plus, more sales typically mean more reviews.
Reviews
Reviews are the social proof customers need to feel comfortable purchasing a product they’ve never seen in person. Amazon knows this, and that’s why the algorithm considers reviews.
And a product with hundreds of positive reviews typically gets more sales than less established listings. It creates a cycle that makes it difficult to overcome the top listings without optimizing along the way.
Advertising
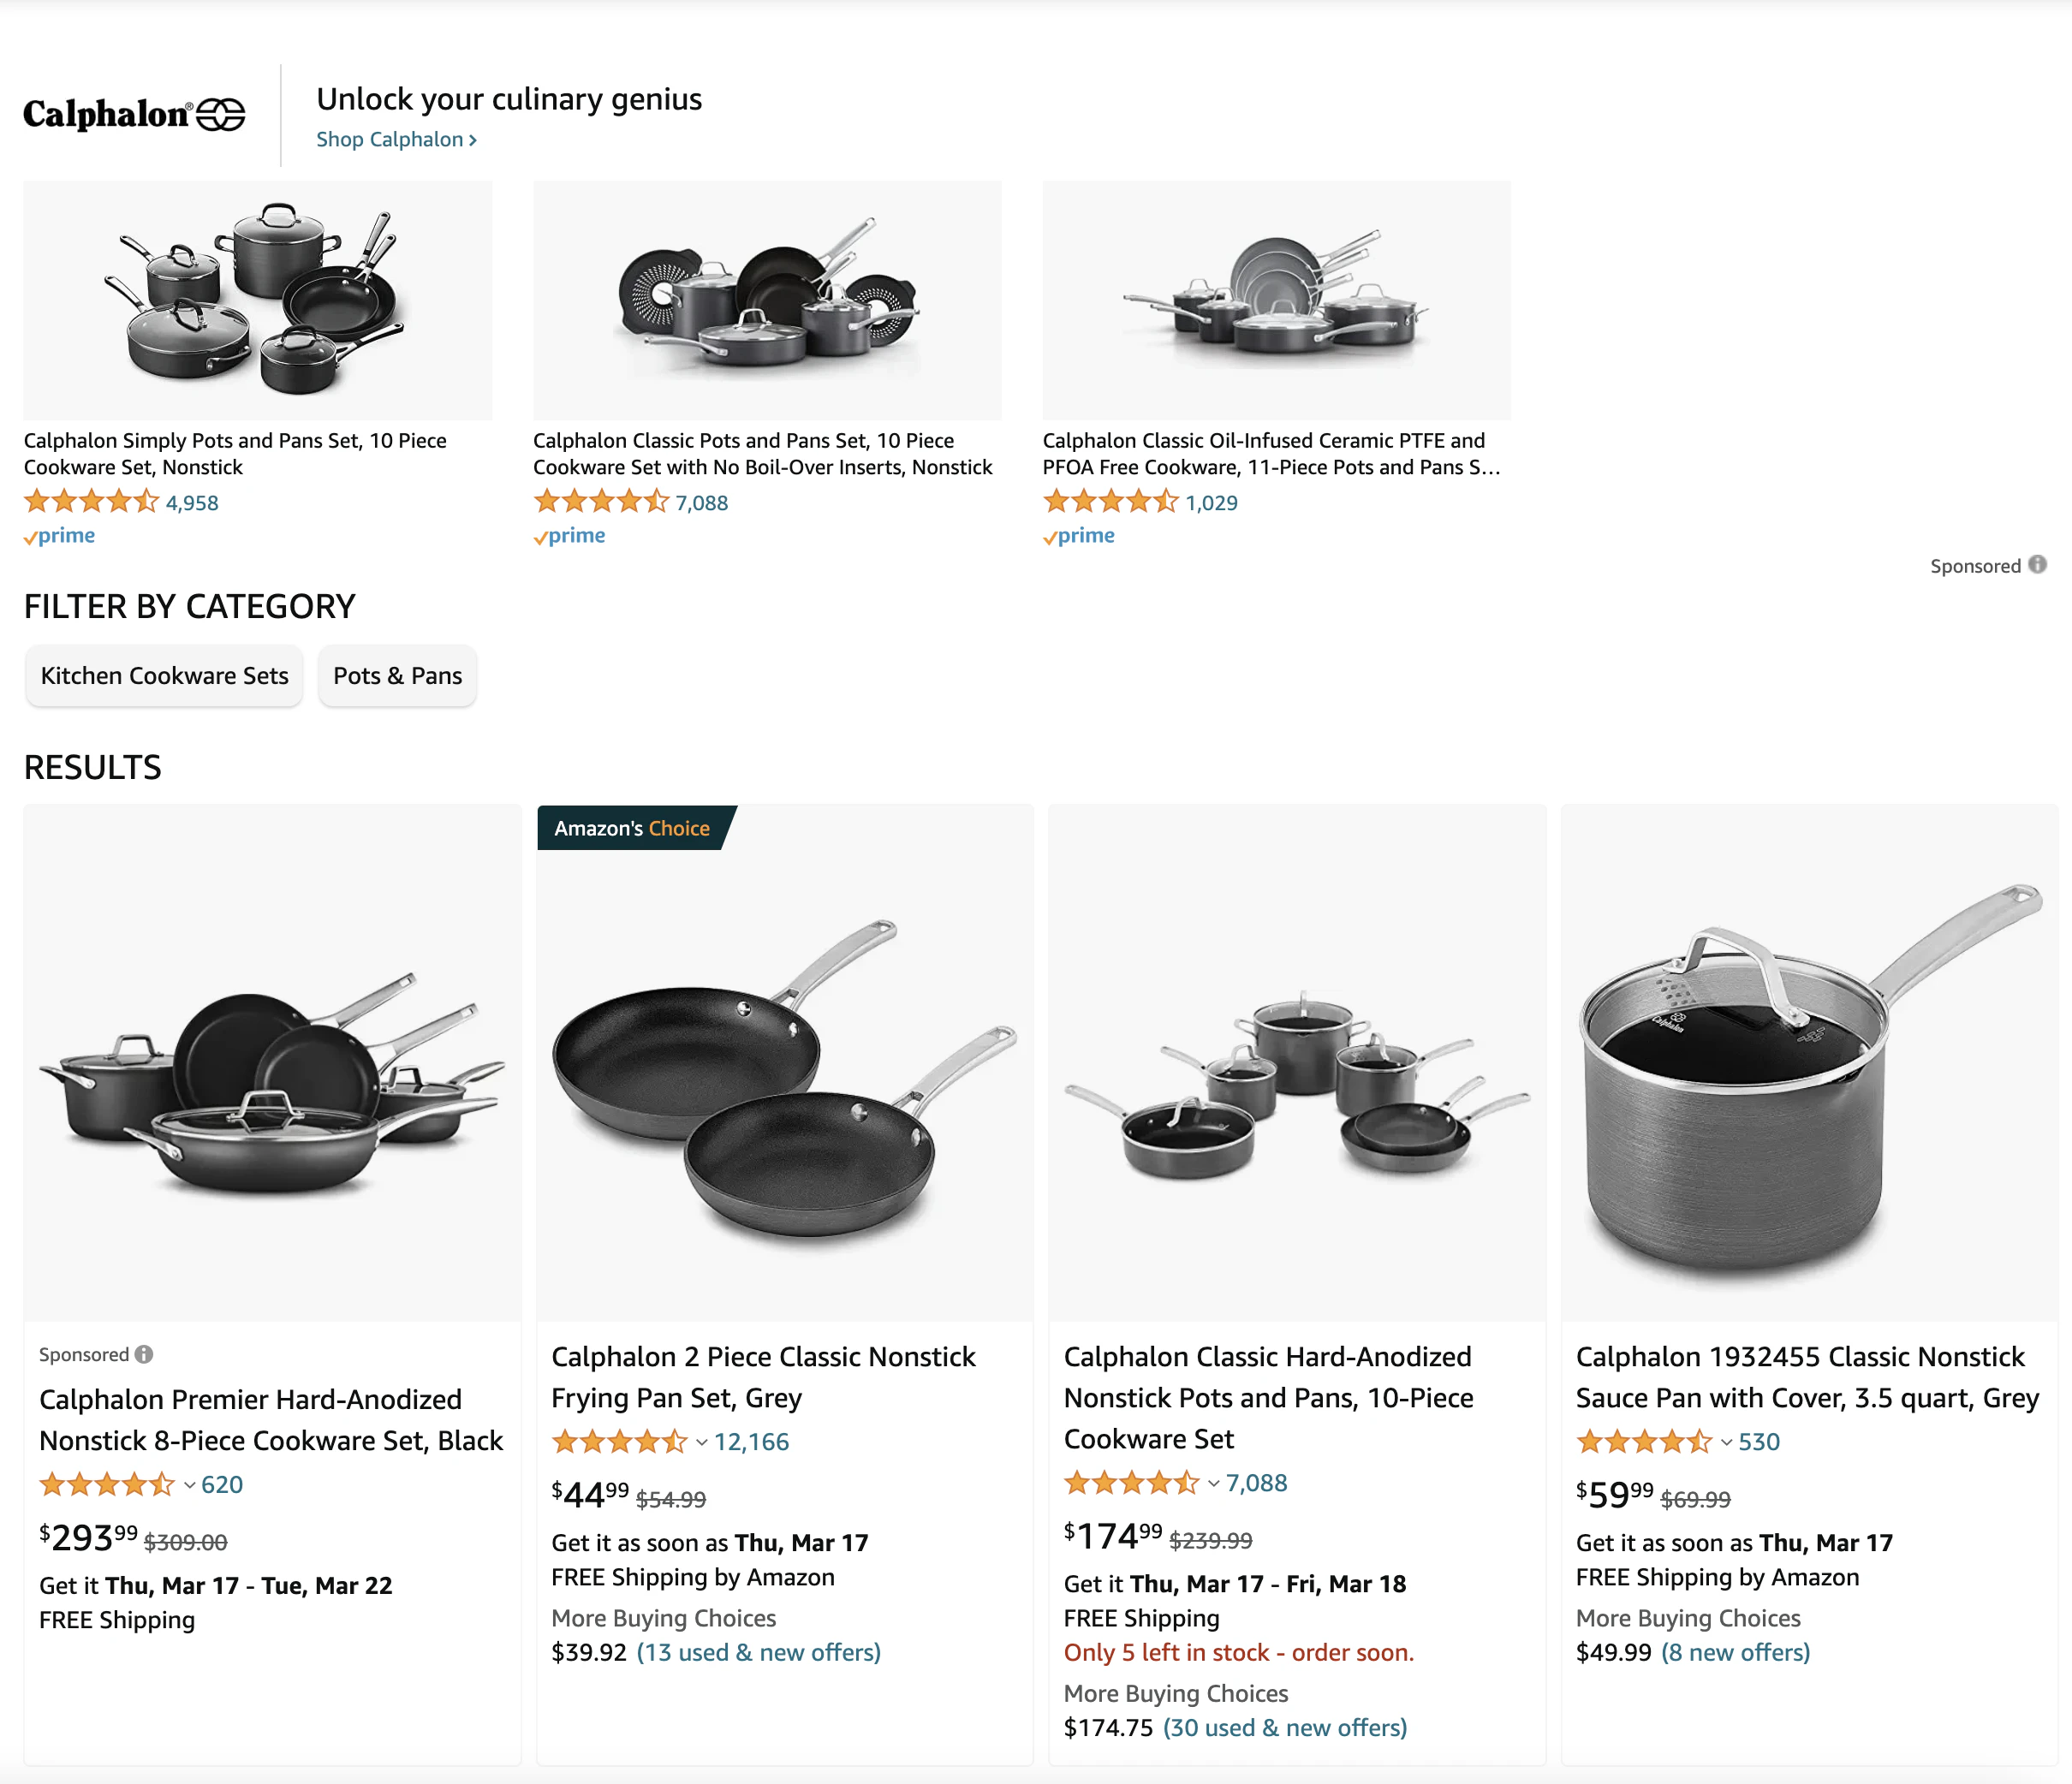
Amazon has its own advertising platform as you know — Amazon PPC. Advertising is how you can gain traction for your listing from the beginning and how you can scale your listing when it’s time to compete for the top spots in the search results.
But advertising only works for listings that are optimized for clicks and sales.
Amazon Ranking Optimization: Keywords and SEO

Кeywords are the overarching theme through most parts of listing optimization. And before we go any further, you should have an exhaustive list of keywords to pull from. To conduct comprehensive keyword research for your Amazon listing, it is highly recommended to use a keyword tool, as it helps identify high-volume keywords and optimize your backend search terms. We’ll go deeper on adding keywords to your listing later, but to start, you need to understand where you’ll use them.
1. Product Title – The title is the first copy your customer reads to learn about your product. You’ll want to create the most descriptive title possible while utilizing your top keywords. Keep in mind, your product title cannot exceed 200 characters. You should use all 200 characters to maximize the number of keywords you can include and by doing that you’ll improve your organic traffic and sales.
2. Bullet Points – Be cautious not to keyword stuff your bullet points and leave out the information your customer needs to know to buy. Amazon allows 250 characters per bullet. Just like with your product title, use the full allotment to be as descriptive with your keywords as you can. Each bullet should show why your customer would want to buy your product instead of one of the hundreds of other options.
3. Product Description – In your product description, you’ll want to build on the product details in your bullet points. You don’t want to reuse keywords, though. So, try to incorporate keyword variations that demonstrate additional product benefits instead of repeating information and wasting valuable space.
4. Backend Keywords – Amazon gives you up to 249 bytes of space to add key search terms you either don’t have space for or don’t want to include in your customer-facing copy.
In the next section, you’ll learn the nuances of each element, but be sure to have your list of keywords ready so you can determine the best placement option for each. Product listing optimization is the process of integrating these keywords and improving your content to boost visibility and increase sales on Amazon.
Amazon Listing Optimization: Optimizing Content
Now let’s get into how you can optimize your entire listing, starting with your product title. Optimizing Amazon listings is a key strategy to increase sales and reduce advertising costs, making it essential for success on the platform.
Product Title

1. Choose the best keyword title.
Your product title is one of the few vital pieces of information your customer interacts with before they decide to click through to your listing or not.
You want to include your strongest keyword at the front of your product title to connect with your customers (and to get your best keyword in your listing URL, which we’ll look at more later).
Don’t try to target a keyword in your listing title that doesn’t fit just because it’s less competitive. Instead, you should save those keywords for other places like your product description.
2. Avoid using all capitals in your titles.
You might notice that some product titles are in all capital letters. The thinking behind this may be that it makes the title stand out, but what it really does is make the title difficult to read.
Our brains have been trained to perceive all capitals as excited or aggressive, which can throw off your customers. You want your titles to be inviting, not alerting.
3. Use title case.
Instead of using all capitals, use title case.
If you aren’t familiar, title case is when you capitalize the first letter of each word (aside from small insignificant words).
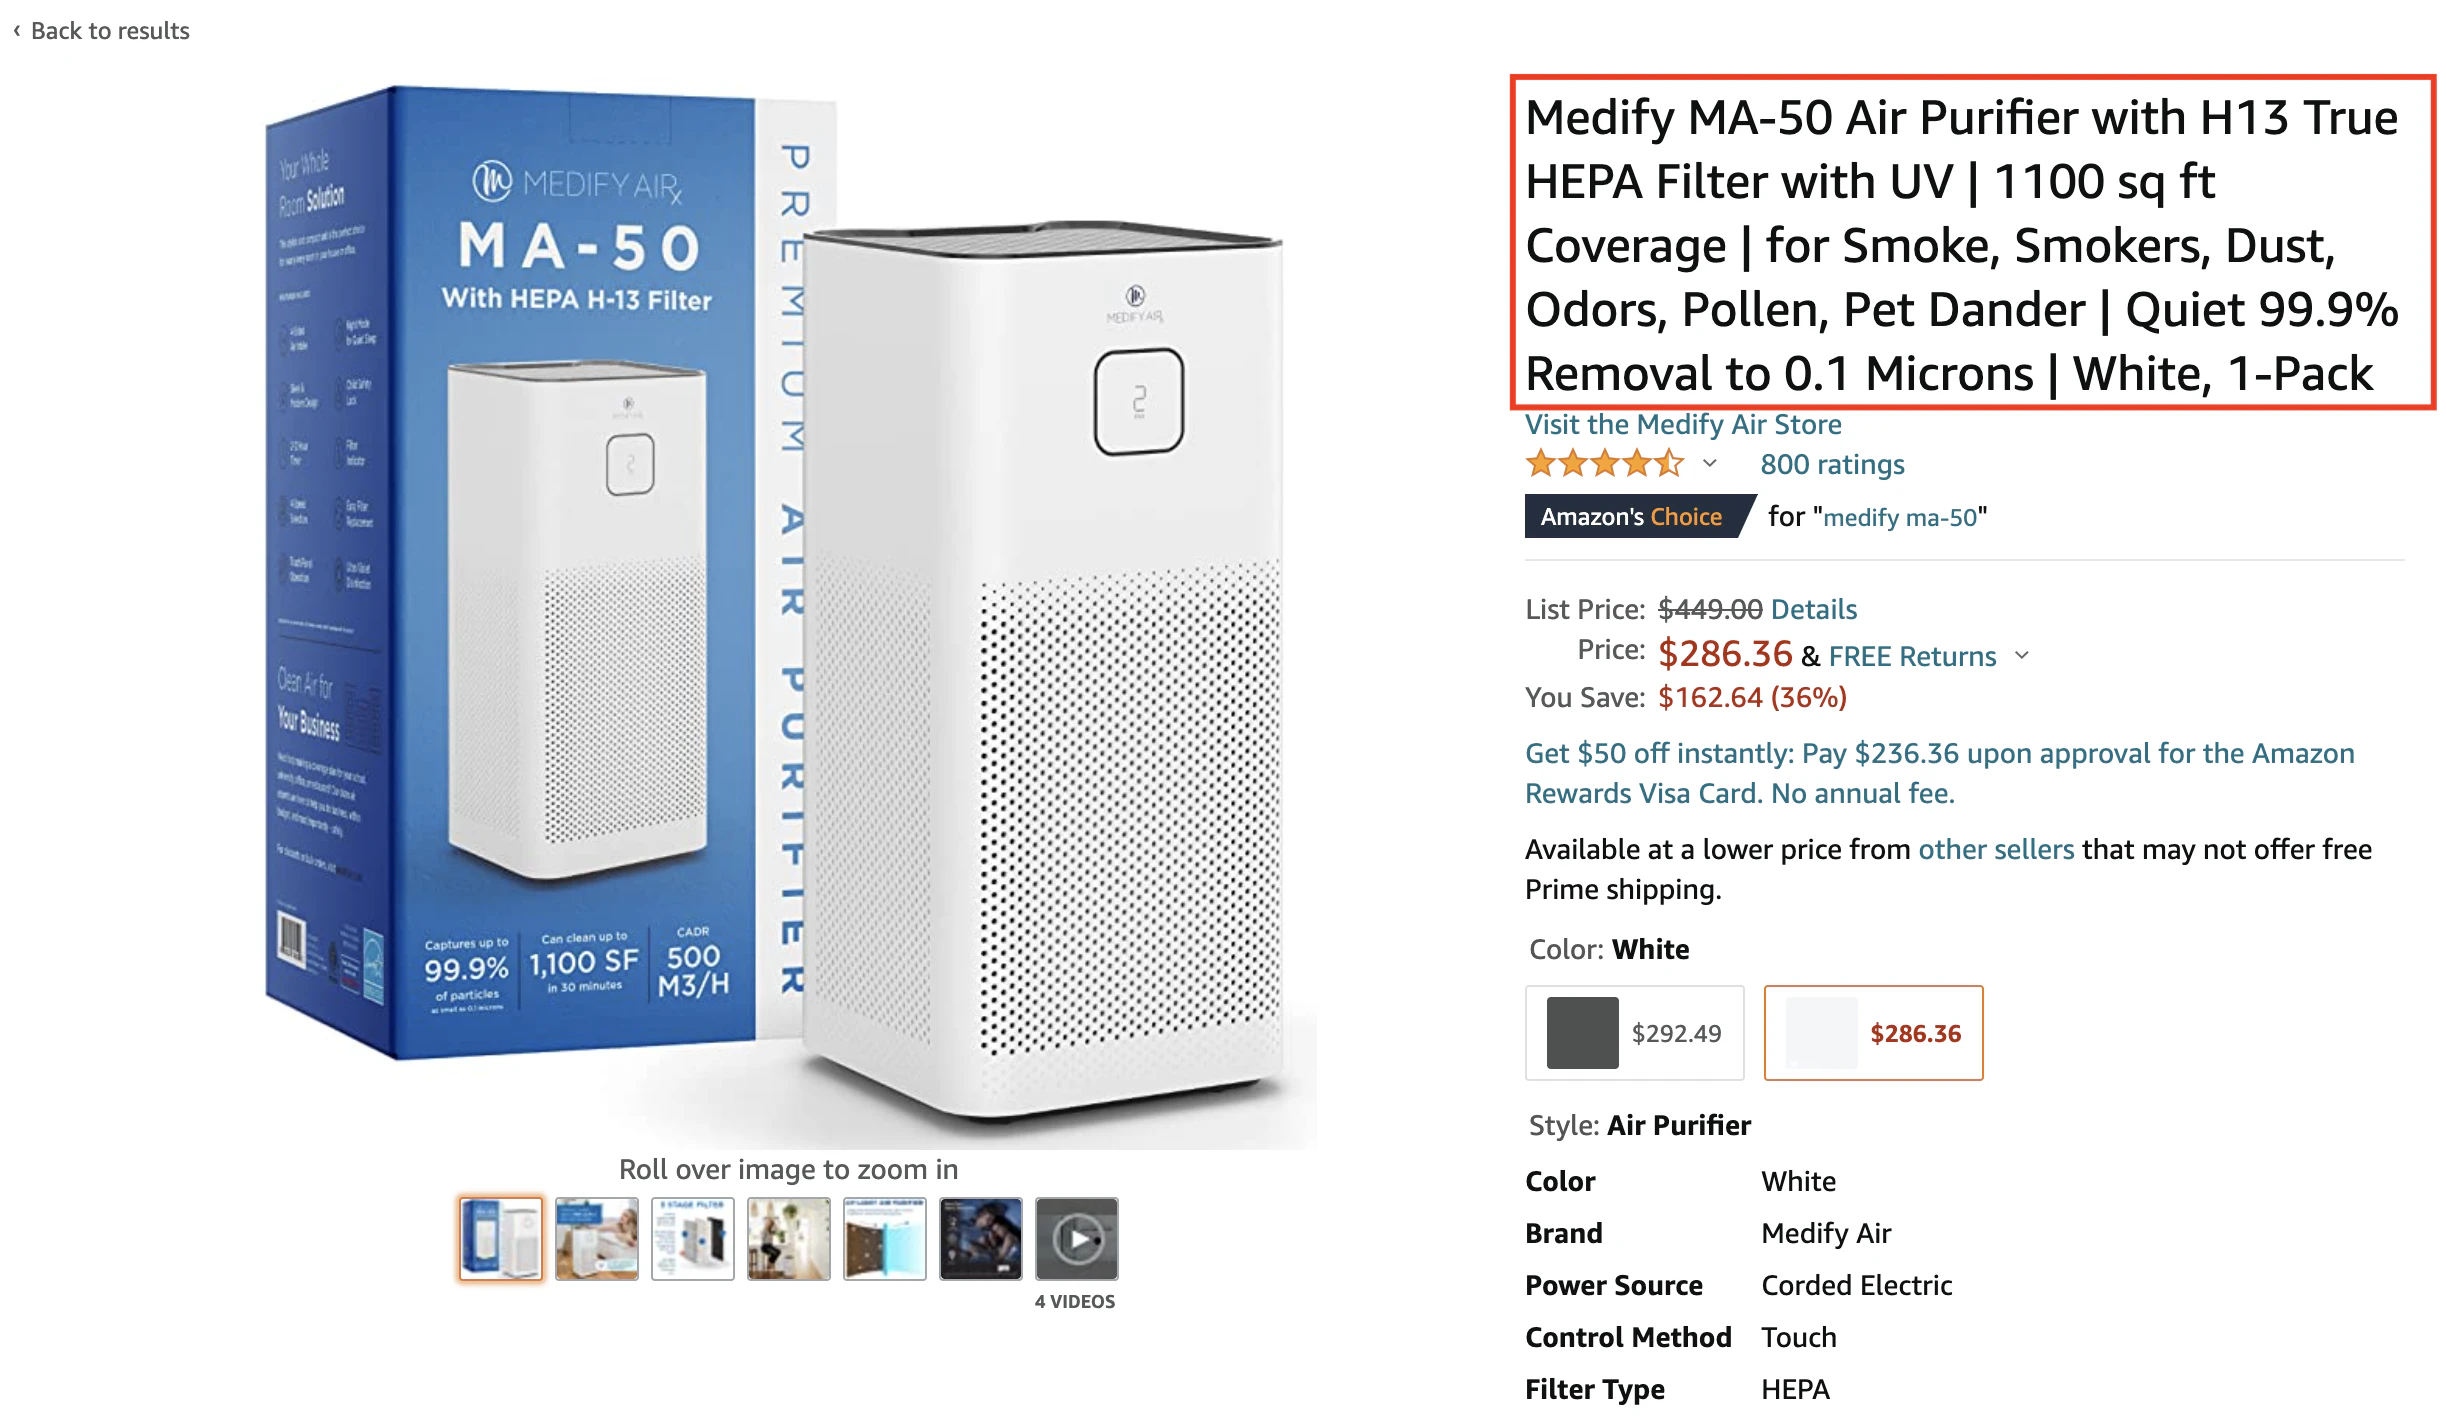
Title case is what your customers are used to seeing. It will add emphasis to the critical words in your product title without being off-putting.
4. Use the word “and,” not the symbol.
Amazon has explicitly stated they don’t want your product title to include symbols.
Plus, when your customers type in a search term, they are more likely to use the word “and,” not the symbol (&). It is easier and more natural when typing both on a keyboard and mobile.
You want to show up for the terms your customers are most likely to use. By using the word “and,” you will show up in more searches and keep Amazon happy.
5. When entering any numerical information, use numerals.
Amazon also tells sellers to use numerals in their titles instead of writing out the numbers (ten versus 10).
Given that you have limited characters for your title, using numerals will free up space for more information about your product.
6. Avoid adding price or discount information.
Your price is listed alongside your product. There is no need to mention your price or any discounts you may be promoting in your title.
7. Don’t add promotional terms.
Phrases like “best” or “top-selling” shouldn’t be included in your product title.
Your product title is reserved for factual information about your product only. Anything that doesn’t directly describe a product feature will need to be avoided.
8. Don’t add any other symbols.
You may be tempted to use other symbols (like *) in your title to try to highlight a key detail, but it’s against Amazon’s guidelines.
Absolutely no symbols should be used in your product title, no matter what you see other sellers doing with their listings.
9. Follow Amazon’s suggested template for product titles.
Amazon knows what works with customers and has provided helpful guidelines for writing product titles. The format of your title will depend on the category, so look at the product title of a few competitors as an outline.
Some of the most common details Amazon wants you to include are:
- Brand (all categories)
- Product name/type (all categories)
- Collection
- Model
- Size
- Color or pattern
- Material
- Quantity (i.e. 2-pack).
So, if you sell cookware, your title might be Brand + Collection + Product Type + Material + Size.
But if you sell tea towels, it may be Brand + Product Type + Material + Color/Pattern + Quantity.
Pay attention to what Amazon recommends for your category, but don’t be afraid to test different product details in your title to find what works.
Product Benefits Bullets
Your bullet points are where you’ll want to briefly call out the most important benefits of owning your product.
Notice that I didn’t say to list the manufacturer specs of your product.
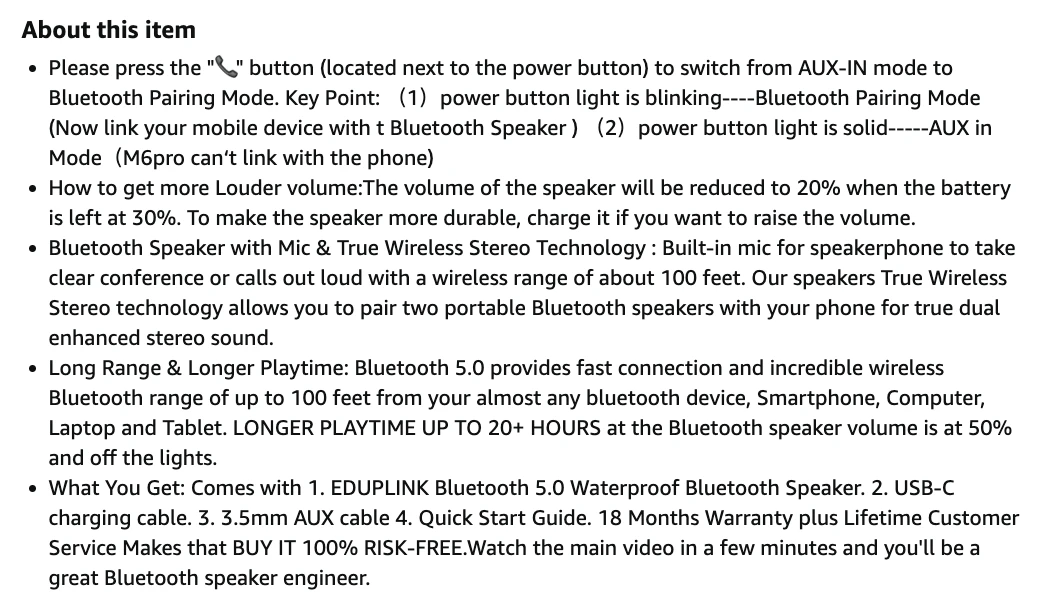
If your bullets only tell me the wattage of your wireless speaker, I’m not going to connect that to the benefit because I have limited technical knowledge when it comes to speakers. What I want to know is if the speaker will be powerful enough for me to hear it if I walk out of the room.
You get five bullet points to tell your customers your most valuable product benefits concisely.
The screengrab below is a good example of optimized product feature bullets. It matches the features you need to know with the benefit of owning the product. The introduction phrase could be more clear, though.
Before you add your key product features to your listing, write down every feature your product has and the benefit the customer gets from that feature. Then, narrow it down to the benefits that would make the customer most likely to purchase your product over the competition.
Not sure how to phrase your product benefits? Head to amazon reviews.
Amazon reviews are a crucial resource for amazon listing optimization 2022, as they can provide valuable insights into what customers care about most. Use insights from amazon reviews to enhance your sales copy and marketing strategies.
You can look at product reviews both on and off Amazon for similar products. Use Google and YouTube to find review sites and channels that do nothing but review as many products as possible. These reviews are very detailed and will tell you what your customers are looking for in your product.
With a quick search, you can find reviews on everything from duct tape to refrigerators.
For example, a quick Google search for “night cream review” yields pages of articles and videos focused on nothing but the pros and cons of different brands of night creams.
Spend a little time with the reviews and take notes on recurring pros and cons and the language used to describe them. Then use a mix of the terms used in the reviews and keywords from your research to write your bullets. Ideally, there will be a natural overlap where many of the phrases from your review research match the keywords to tell you you’re on the same page as your audience.
Your final step for your bullets is to make them easy to scan. Format them so that your product’s value is evident at a glance by front-loading important information and strategically using all capitals for specific benefit-driven words.
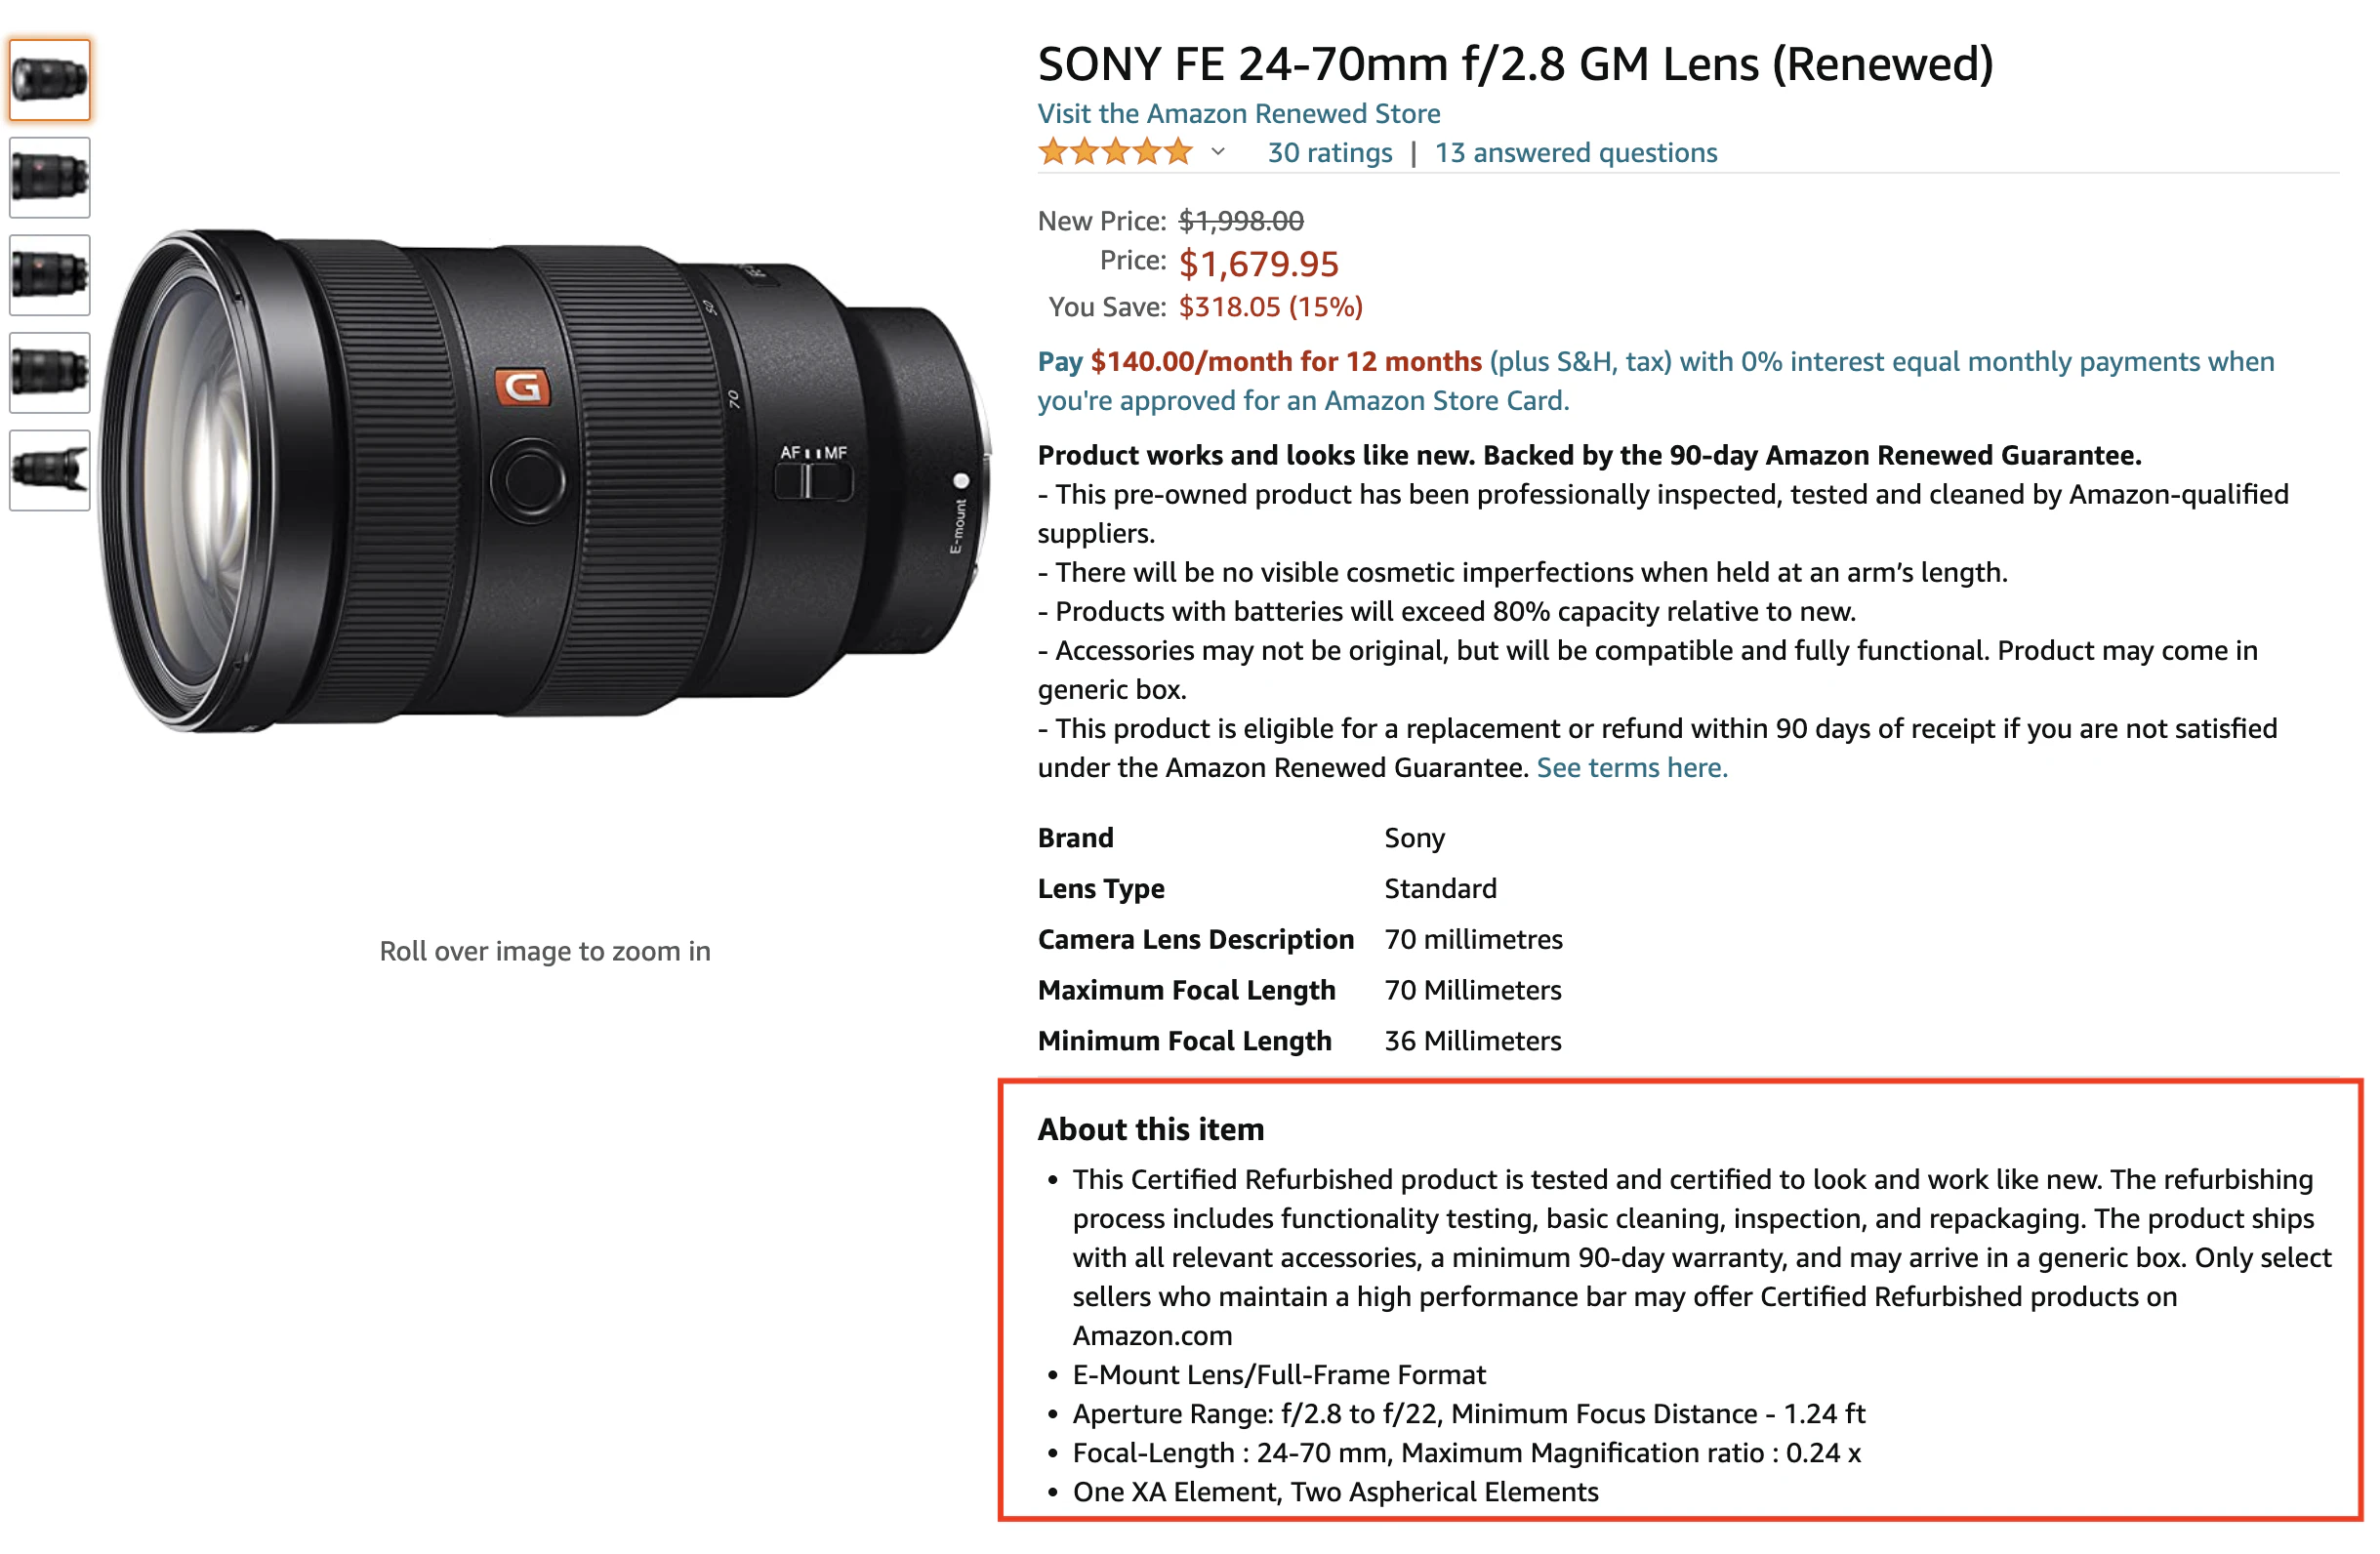
Before you add your key product features to your listing, write down every feature your product has and the benefit the customer gets from that feature. Then, narrow it down to the benefits that would make the customer most likely to purchase your product over the competition.
Not sure how to phrase your product benefits? Head to product reviews.
You can look at product reviews both on and off Amazon for similar products. Use Google and YouTube to find review sites and channels that do nothing but review as many products as possible. These reviews are very detailed and will tell you what your customers are looking for in your product.
With a quick search, you can find reviews on everything from duct tape to refrigerators.
For example, a quick Google search for “night cream review” yields pages of articles and videos focused on nothing but the pros and cons of different brands of night creams.
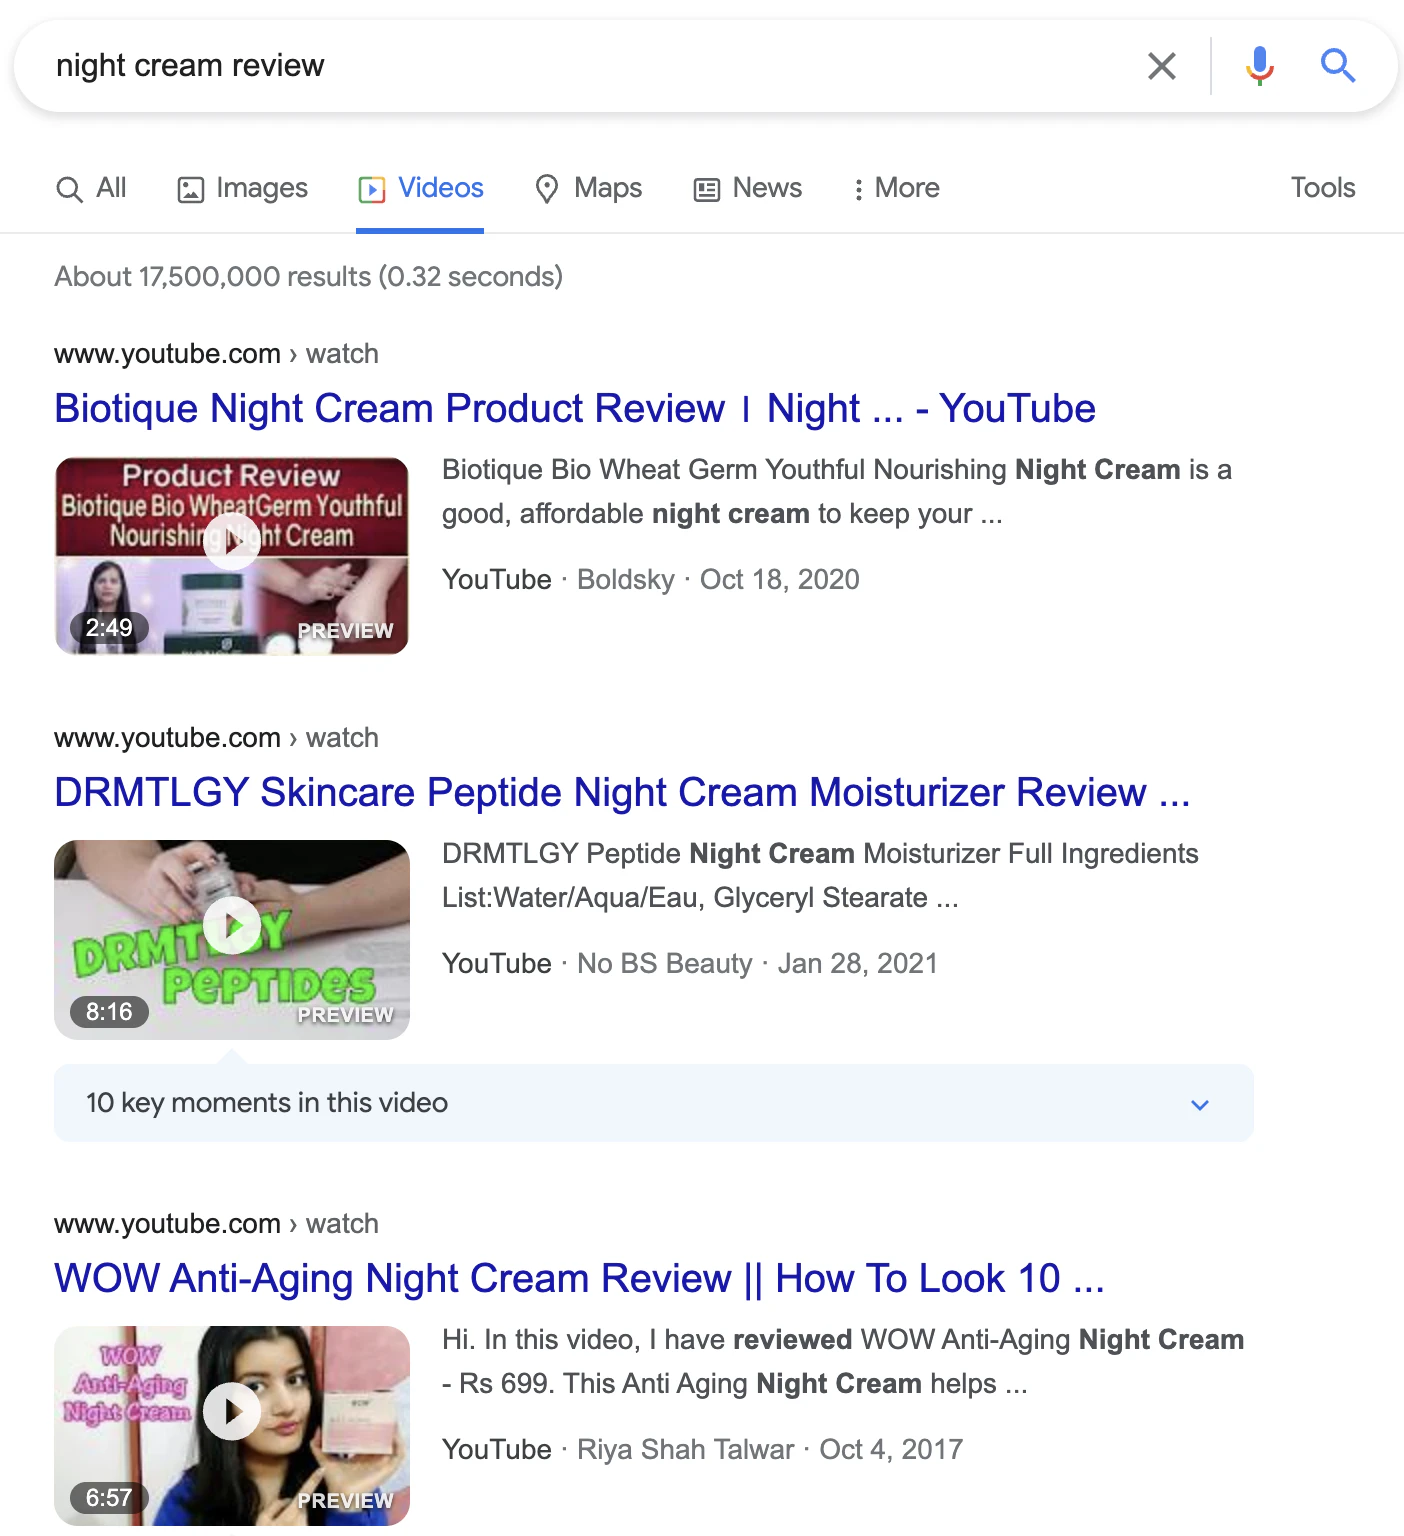
Spend a little time with the reviews and take notes on recurring pros and cons and the language used to describe them. Then use a mix of the terms used in the reviews and keywords from your research to write your bullets. Ideally, there will be a natural overlap where many of the phrases from your review research match the keywords to tell you you’re on the same page as your audience.
Your final step for your bullets is to make them easy to scan. Format them so that your product’s value is evident at a glance by front-loading important information and strategically using all capitals for specific benefit-driven words.
Product Description
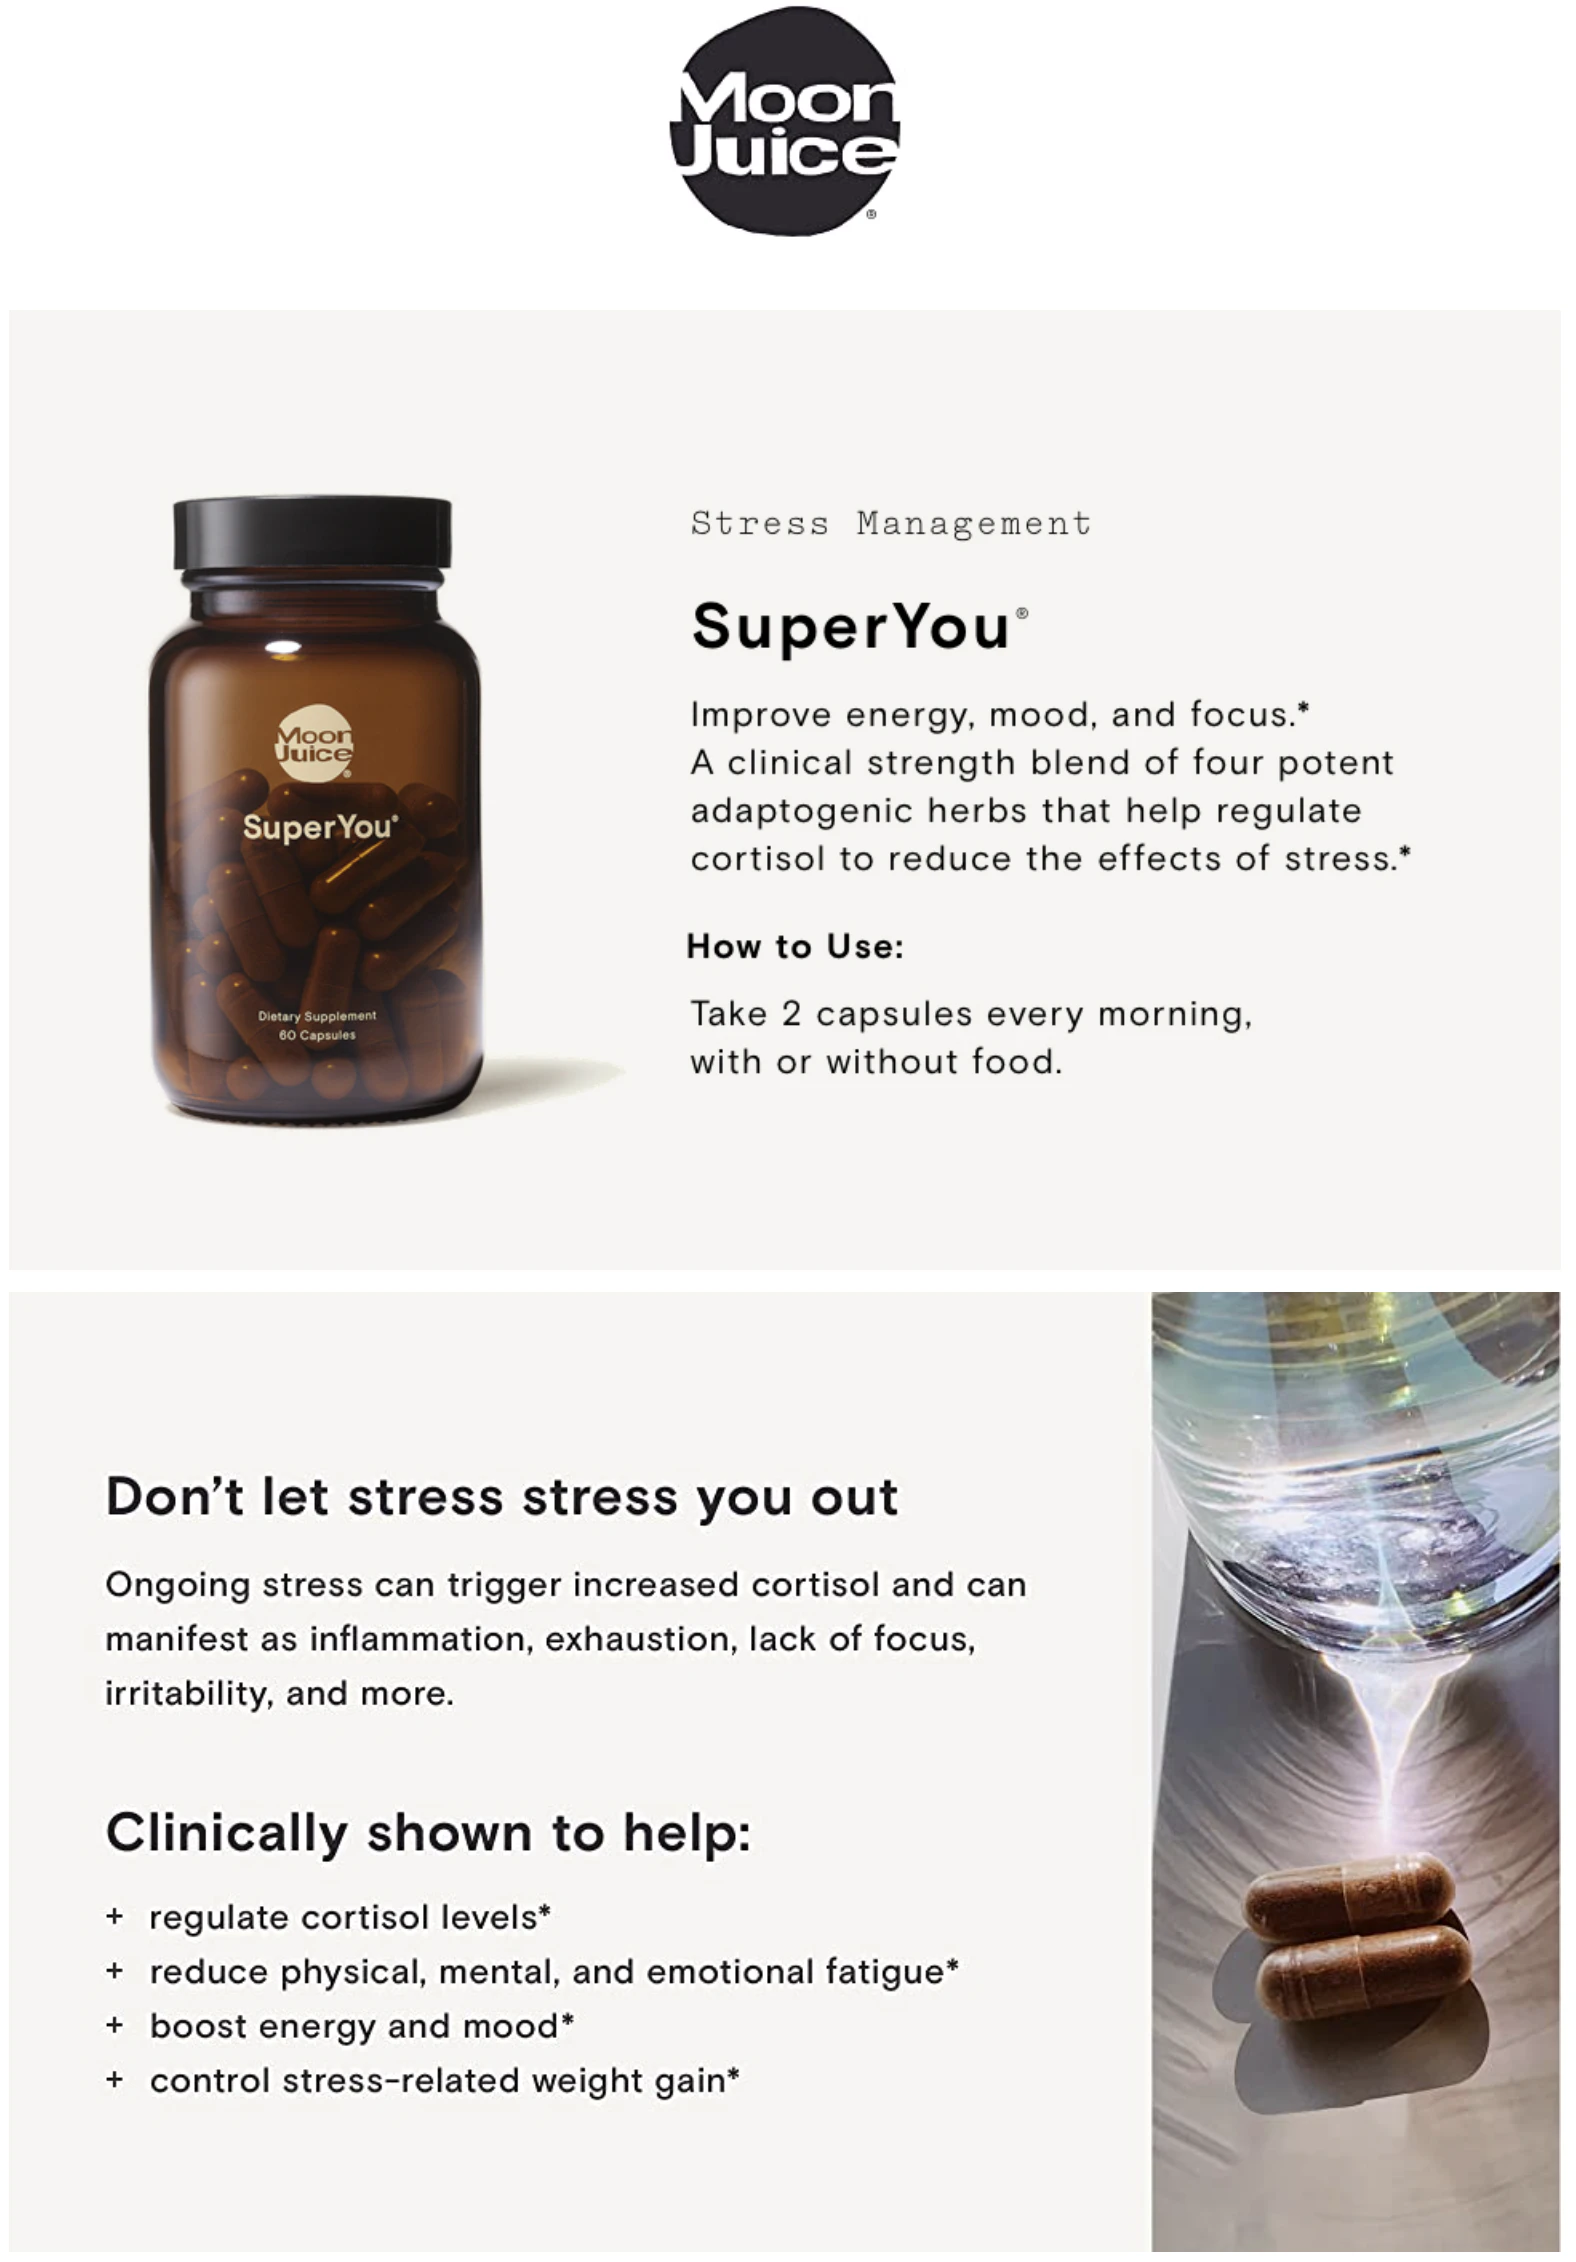
Because product descriptions on Amazon aren’t front and center, they often get treated as an afterthought. But your product description is another opportunity to connect to your customer.
1. Dig Deeper Into Your Key Features: Since your bullet points only have limited space, you may not be able to cover your main features and benefits as fully as you’d like to. You can use the product description to dig deeper. For instance, if the technical details of your product are crucial to understanding its benefits, but most of your target audience isn’t privy to that knowledge, you can more clearly explain without the short character restrictions in the description.
2. Describe Extra Features Not in Your Bullets: Maybe your product has more than five features that your customers truly need to know to make a purchasing decision. This is often the case for complex categories like technology. The description is your chance to tell your customer what else they can expect to gain. Be sure to use accurate punctuation so that each point is separated. If not, the features will run together and be difficult for your customers to understand.
3. Call Out Other Possible Uses: If your bullets focused on one target audience, but your product has three potential audiences, you could use your description to call out those other uses in an attempt to caption a broader market. Be aware that if you go this route, you need to have already gained traction with your primary audience, or it could throw them off and make your description too vague to convert well.
4. Back-Up Your Product With Proof: Amazon does not want you to make claims about your product based on your opinion. Meaning you shouldn’t promote your product under any claims that you cannot back up. However, if you do have proof, your product description is the perfect place for it. If you’ve had any product research done, won any industry or consumer awards, or have an influencer endorsement, the description is a great place to talk about those.
5. Include keywords you didn’t already use: Once you’ve written the best possible product description, go back through and see if there are any opportunities to add keywords you haven’t already used elsewhere in your listing. Again, don’t force keywords that don’t fit, but look for one or two natural placements.
Product Images
Main product images have slightly more guidelines than additional product pictures. Your main image is the only image your customer will see before deciding if your listing is worth viewing. It’s also the image that will show when you’re running any Amazon PPC ads.
But Amazon is particular about how your main image must be composed.
The main image must be on a plain white background, not contain any props, and must take up at least 85% of the frame. Your main product photo is not the place to get creative. Instead, you want to make sure your picture captures your product at the right angle, that there’s good lighting, so the color renders accurately, and that it is high-resolution.
Amazon requires every photo to be at least 1,600 pixels on the widest side (and no less than 500 pixels on the shorter side). This applies to your additional images as well.
The additional photos on your product page are where you finally get to be more creative with how you demonstrate the value of your product.

You want to include as many images as possible in your listing. Your product images should show your product from each angle and in multiple-use states (such as a lamp on and off). Many product categories benefit from lifestyle photography or showing off the product while in its intended environment.
Finally, don’t forget the value of adding product photos with explainer text to showcase any non-visible product benefits.
Even the most straightforward products can use explainer graphics to highlight product benefits. For example, consider the microfiber cleaning cloth set below.

Of course, the intended purpose of the cloths is to clean surfaces, but an added benefit is that the cloth is reusable, so it’s better for the environment. This listing could take the image a step further and show the cloth in action cleaning up a spill (instead of using a disposable paper option) to emphasize the reusable benefit.
You don’t have to hire a designer to create complementary product photos. Just keep them clean and simple so customers can focus on the value.
Keywords
Before you initially set up your listing, you should have completed keyword research. If you aren’t sure your keyword research was comprehensive enough, go check out our post on that next.
When your listing is in its infancy, you want to focus on long-tail keywords with less competition. You can then slowly move to the highest search volume keywords once your product listing has the sales and social proof to back it up.
The next step is to make sure you are ranking organically for the keywords you chose.
The most basic way to know if your keyword is ranking organically is by quickly searching your targeted keywords and seeing where you show up in the search and if other products showing up at the top of the results are similar to yours. This method is free but time-consuming and probably not as accurate as other methods.
You could use Helium10 to track your organic rankings faster.
Keep in mind that your listing won’t rank high in the results even if you are using the right keywords until you start to build daily sales and reviews.
Plus, since we don’t know exactly what Amazon uses in their algorithm to determine what to show, you can’t know that your product may not be showing up differently in someone else’s search results.
Another option is to wait until you’ve started to get more traffic and sales (be prepared that this could take a while if you’re only using an organic approach) and then test alternate keywords by switching one out for another over a period of time and tracking the results.
But the best way to improve your organic rankings is to supplement your organic sales with Amazon PPC.
Additionally, monitoring your unit session percentage can help you evaluate the effectiveness of your Amazon listings and identify opportunities to improve conversion rates.
Running PPC campaigns will come with multiple benefits.
1. You’ll learn what keywords work for your product.
2. You’ll likely get some sales.
3. It will help your organic ranking.
When you run campaigns, you get access to your search term report. The value of the search term report cannot be understated. You can use it to continue to improve future paid efforts, but they also help guide your organic approach.
The search term will help you identify if your listing isn’t getting enough traffic indicating either the wrong keywords or that your price, title, and/or main image need to be adjusted.
It can also tell you if you have keywords that are getting clicks but not converting, telling you that your keywords aren’t the problem, but the listing details are probably to blame for your lack of sales.
There is a lot you can do with this keyword information to build your listing to a point where it is performing organically.
Considering how fundamental using the right keywords for your listing is, it’s not something you want to skip. Also, make sure you are not missing out on any long-tail keywords. Usually they work well and are much easier to rank for.
Backend Keywords
Your backend keywords provide you a unique opportunity to use keywords you don’t necessarily want your customers to see. You should take advantage of this.
Amazon claims they cover slight misspellings of keywords, but it’s hard to say how far that goes. If there are any less-common misspellings of your product, you want to include those misspellings in your backend keywords.
You may also want to include alternate or slang terms your customers may use depending on their demographics, like location and age. This is where a tool like Google Trends comes in handy.

Google Trends helps you compare search term trends over time and also allows you to see related queries broken down by region. Language is constantly evolving, especially for new products, and staying on top of new terminology helps you identify keywords you can use in the backend of your listing to capitalize on the trend from the beginning without losing ground on current trending search terms.
A+ Content
A+ content is only available to sellers on the Amazon Brand Registry. A+ content can help boost sales and optimize product listings within your Amazon store. To be eligible to join the Brand Registry, you must have an approved registered trademark.
Instead of a basic product description, sellers on the Brand Registry can utilize modules to tell their brand and product story.
While you can’t custom code your A+ content, you can use a drag and drop editor to create a product details page that fits your brand.
The current A+ content modules available are:• Multiple header designs • Single Image and Sidebar • Single Image and Specs Detail • Single Image and Highlights • Four Image Highlights • Image and Light Text Overlay • Comparison Chart
A+ content is image-heavy with scannable copy and often a comparison chart that showcases other products available from the brand if an alternate product is a better fit. The comparison chart is crucial if there are several similar variations of a product – like size tiers – to prevent customers from jumping to another brand.

While you can’t custom code your A+ content, you can use a drag and drop editor to create a product details page that fits your brand.
The current A+ content modules available are:
• Multiple header designs
• Single Image and Sidebar
• Single Image and Specs Detail
• Single Image and Highlights
• Four Image Highlights
• Image and Light Text Overlay
• Comparison Chart
A+ content is image-heavy with scannable copy and often a comparison chart that showcases other products available from the brand if an alternate product is a better fit. The comparison chart is crucial if there are several similar variations of a product – like size tiers – to prevent customers from jumping to another brand.
Product Reviews

Product reviews can make or break your listings. So you need to make it a priority to get new reviews and manage reviews as they come in.
There are programs and tools available that can help you do this without the headaches.
To get your initial product reviews, Amazon offers the Amazon Vine program to help sellers. The Vine program is available to sellers with less than 30 reviews, but you have to give your products away for free to Amazon-selected reviewers.
(Note: They also used to have an Early Reviewer Program, but it closed effective April 25, 2021.)
If you are making sales, but those customers aren’t leaving reviews, you may want to sign up for a tool to help you follow up.
Feedback Express is a tool that will automate sending feedback requests to your customers, and it will help monitor your reviews for negative feedback. This allows you to try to address the negative review before it potentially impacts future sales.
But you need to be aware there are several ways you do NOT want to get reviews, or you may get your account suspended.
- DO NOT send products in exchange for reviews.
- DO NOT offer a discount in exchange for a review.
- DO NOT let family and friends give fake reviews.
- DO NOT include a request for positive reviews in your product packaging.
- DO NOT pay for reviews or work with a company that pays for reviews.
Listing Questions and Answers
You may be wondering how you can optimize a question and answer section when you can’t control the questions, and other customers are free to answer as well.
It comes down to customer service.
1. You need to respond to every question on your listing, even if it’s been answered before. By responding promptly and professionally, you’re building trust in your product. When you show that you’re a brand that takes time for your customers, it creates confidence that you’ll work with them to make it right even if the product isn’t perfect. But if you ignore questions, how can they count on you to respond after they purchase if there’s an issue? The Q&A section is a chance to make a good impression.
2. Customers read past questions to gain knowledge of a product. You don’t want a wrong answer from another customer influencing purchasing decisions because you weren’t keeping up on your customer communication. You should prevent misinformation in your product page Q&A.
There may be times when you don’t know an answer to a question, or a question may not make sense for your product. In those cases, you have to decide if it’s better to ignore the question entirely or leave an answer that isn’t helpful. Of course, you should only ignore questions if you believe it would be more damaging to your brand to answer than useful to the customer.
Seller Rating

Your seller rating has to do with your customer service, cancellations, fulfillment, and other aspects surrounding your product. It doesn’t reflect your product ratings or reviews.
Your product could have rave reviews, but if you fail to ship your products timely and don’t respond when customers reach out on Amazon, it will lower your seller rating.
The easiest way to handle customer responses is to develop canned responses, so you aren’t forced to rewrite the same email repeatedly. Fortunately, Amazon supports using canned customer responses and allows you to store email templates.
Communication can solve a lot of customer complaint issues before Amazon knows they exist. You want to open a line of communication with customers to reach out to you instead of customer support with questions and concerns.
If you sell your products through FBA, you can send one follow-up email per purchase. But Amazon only facilitates manually sending emails, so sellers doing more than a few sales a day will have a hard time keeping up. However, there are tools available to automate the process for a price for high-volume sellers.
Though seller ranking isn’t traditionally considered a part of your listing, you need to maintain a strong seller rating, so you don’t fall out of favor with Amazon’s algorithm. And so your customers don’t look elsewhere for the product.
Аdditional Amazon Listing Optimization Tips You Should Consider

1. ESTABLISH 3-5 TARGET KEYWORDS TO INCLUDE
You’re going to want to have an exhaustive list of keywords for your product, but you won’t be able to use them all in your listing.
The point of developing the list is to:\
- Make sure you aren’t missing opportunities. 2) To ave keywords you can test in your listing and PPC campaigns if your original choices aren’t performing.
However, you’re going to want to pick a handful (3-5) that you are focusing on more than the others. You will want the strongest keyword in the front section of your product title. The others you will want to find a way to incorporate in your product description.
If you’re unsure where to start or want to maximize your results, consider using amazon listing optimization services. These services provide expert guidance, advanced tools, and proven strategies to improve your product visibility, ranking, and ROI.
2. CONSIDER OPTIMIZING YOUR TITLES FOR MOBILE USERS
Amazon recommends having fewer than 80 characters in your product title, even though they technically allow you to have more than double that amount.
But because many shoppers are using mobile, the longer titles will have information cut off. If you feel like you can’t fit all your key information into 80 characters and you choose to create a longer product title, at least make sure you include the essential information in the first 80 characters.
This includes your strongest keyword, your brand, product type, and other details like product material, size, or color that your customers would want to know before they choose to click through to the rest of your listing.
3. CUSTOMER EXPERIENCE OVER KEYWORDS
In case you weren’t aware, Amazon places customer experience above everything else on its marketplace. As a result, sellers that choose to do the same are more likely to be successful.
One thing that takes away from a positive customer experience is listings stuffed with keywords and are nearly impossible to gather meaningful information from. These listings mix and match every keyword they can fit into their listing without worrying about providing the customer with precise product details.
Try to use only keywords that naturally fit into your title and description.
Choose keywords that make sense together, such as keywords that use similar terminology. You can use one-off keywords in your backend to keep your listing cohesive if you genuinely feel they are needed.
4. BUILD YOUR BRAND
Don’t forget that established brands can price their products for better profit margins because they have a customer base that trusts them.
Be sure to include your brand in your listing both in your title and in other places, like your bullets and photos, when it makes sense. For example, your product packaging should be branded, and you can use those photos in your listings. Let’s add an example here:
If you haven’t trademarked your brand yet so you can access A+ content, you’re going to want to. As we covered earlier, A+ content opens up a range of advanced product page features that can set your brand apart from your competitors.
Brands also have more advertising options on the marketplace, like Sponsored Brand ads. But don’t be afraid to branch out. Just because you only sell on Amazon doesn’t mean you can’t build brand recognition offsite as well. When your customers search, you want them to find your social channels and, ideally, a website. A strong presence on multiple platforms promotes brand credibility.

5. HONE YOUR VALUE PROPOSITION
What is the value in using your product over all the other choices available?
Above all, that’s what your listing needs to tell your customers. Try to hone your product’s value proposition so you can add it to your title, description, photos, and A+ content.
Your product may have several features that you think make it better than similar products on the marketplace, but ultimately you need to capture your customer’s attention quickly, and a concise value prop will allow you to do that.
Look at your customer feedback to see what is most often positively mentioned about your product to make sure what you think is valuable matches what your audience thinks is.
6. USE COMPETITOR KEYWORDS IN YOUR BACKEND KEYWORDS
Once you’ve launched your listings and started gaining traction, you may want to entice some of your competitors’ customers to try your product.
This strategy is especially valuable if your competitors have a fully established brand with shoppers searching for branded keywords.
For example, if you sell fragrances and your competitor uses a specialty product name like “Eau de Parfum,” you can include the product name in your backend keywords to capture some of their audience.
You, of course, don’t want their keywords in any of your customer-facing product information, but you can add them in your backend keywords. This way, when a customer searches for their product, you could show up in the search results as an alternative.
Your product listings won’t likely show up as the first result, but they could show up on the first page if they don’t have many listings for the product type and continue to build your brand awareness organically.
7. DON’T UNDERESTIMATE THE POWER OF GRAPHICS

Your product images can be more than photos of your product. In many cases, they should be more than standard product images. Product images with added graphics to provide additional details or even infographics that strictly provide extra details without your product’s image can be wildly valuable to your customers.
You want to include explainer graphics for any technical products, products that require measurements or sizing, and anything that’s operation is more than turning the product on and off.
The more your customer feels like they will already know what to do when the product gets to them, the less resistant they will be to purchasing.
8. MAKE EVERY PART OF THE LISTING WORK INDEPENDENTLY
You should never assume a customer is consuming all of your listings before deciding to buy or not.
People shop differently. Some people only look at photos, some read copy, and some pour through every piece of it before hitting “add to cart.”
Your customer base likely has a combination of each type of buyer. You need to set your listing up so that every element can convert independently of the other elements. Any key detail you add in your description should also be in your photos and vice versa. Your A+ content should reiterate your bullet points.
To fully optimize your listing, you need to evaluate how well each element would perform if none of the other elements were there to support it.
9. ADD SHORT PRODUCT VIDEOS

On top of product images, Amazon allows sellers to add short videos to product listings.
A video can help demonstrate products, so customers know what they’re getting and how to use it before it gets to them, building confidence in their purchase.
Amazon product videos should:
- Be short and to the point – Your listing is the time for a 10 minutes long video calling out every feature of your product. Focus on the key points your customers need to know.
- Add value to your product listing – If your video isn’t demonstrating, explaining, or showing a testimonial for your product, then your video probably isn’t adding anything to the listing. A few products may benefit from a simple 360° video, but for most products, your video needs to do better, or you’re wasting your customers’ time.
- Fit your brand – Product videos should fit your overall brand and messaging. Be sure to include your logo and use the same language in your bullets and product description.
But your product video shouldn’t:
- Contain any external links – Amazon guidelines restrict videos with outside links, so don’t try to sneak them in.
- Be confusing or misleading – You don’t want your videos to create more questions for your customers. Show your video to someone who doesn’t know your product before uploading to double-check its clarity.
- Take the place of explainer images – Just because your listing has a video doesn’t mean every customer will watch it. A video is not an alternative to high-quality images and explainer graphics.
10. CHOOSE THE RIGHT PRICE
There are three ways to price your products on Amazon:
- Go for the lowest (or near lowest) price
- Price competitively, but in the midrange
- High-end price for the luxury market
And while there are some micro-strategies within each type of pricing, you need to decide which tier your product fits in.
For most sellers, the competitive mid-tier is the best choice. The lowest price is impossible to sustain, and the luxury market limits your growth, especially for a new product.
But how do you get your product to stand out in the most competitive pricing tier?
One option is to utilize coupons or Amazon deals to gain traction. This strategy allows new customers to take a chance on your product at a lower price while not starting with a basement price. Everyone likes a deal; no one likes a product that starts low and rapidly increases.
11. ADD COMMON QUESTIONS AND FEEDBACK TO YOUR LISTINGS
Are you getting the same questions on your listings? Or maybe you have multiple reviews commenting on the color being slightly different than they expected. You can use that feedback to create a stronger listing.
An optimized listing should cover all commonly asked questions or comments so future customers don’t have to search for answers. Remember, customers who know what they are getting are happy customers.
Each month, review all questions and feedback. For anything that 1) isn’t covered in your listing and 2) has been brought up more than once.
12. MAKE YOUR PRODUCTS PRIME ELIGIBLE
We talked about the algorithm favoring Prime-eligible products, but did you know there are over 142 million Prime subscribers?
Because they’re paying for Prime, subscribers pay attention to eligible products.
The easiest way to qualify for Prime is to enroll in Amazon FBA. FBA allows you to store your products in Amazon warehouses and lets Amazon employees handle picking, packing, and shipping — all for small fees.
But that’s not the only option. Your products can be fulfilled by merchant and be Prime eligible under strict circumstances.
If you’re fulfilling your own products, you’ll have to:
- Ship 99%+ of your orders on time
- Maintain a cancellation rate of under 0.5%
- Support weekend delivery and pick up
- Meet 1-day and 2-day delivery guarantees
- Agree to the Amazon Returns Policy
You’ll also have to pass a trial period and follow all of Amazon’s guidelines.
Note: When this article was published, Amazon wasn’t accepting new applicants for Seller Fulfilled Prime. You can check here for updates and more information.
13. MAKE LISTINGS EASY TO FIND WITH VOICE
Amazon offers smart home voice devices, and most mobile keywords offer a talk-to-text option already. Plus, the Amazon app has introduced the options to use Alexa. We’ve heard about the future of voice, but the beginning is already here.
Customers are still typing their searches more than voice search for now. However, a shift is coming.
When you’re optimizing your listing, you can’t forget about voice search. So, what’s the difference?
Well, the way we talk and the way we type aren’t always the same. For one, we use more slang terms when we talk. And our phrasing also changes.
Natural language patterns dictate the order we use descriptive words when we speak, but we’re more likely to break the patterns when we type.
Let’s look at a quick example:

If you were to search for a gift for a 14 to 16-year-old boy, would you say “gifts for teenagers boys 14-16?” Probably not. Odds are better that you’d say “gifts for 14 to 16-year-old teenage boys.”
While Amazon will likely handle the slight differences without too much issue, it’s still a change you need to consider, especially if you plan to use exact match PPC campaigns as a growth strategy.
14. TAKE ADVANTAGE OF AMAZON’S POWER ON GOOGLE
At the beginning of this article, we mentioned adding your most valuable keyword at the front of your product title. Doing this will help your listing stand out in the search results, but the added benefit is that your keyword will be included in your product page URL.
Having the keyword in your URL makes it more likely that customers who start their search on Google will find your listing.
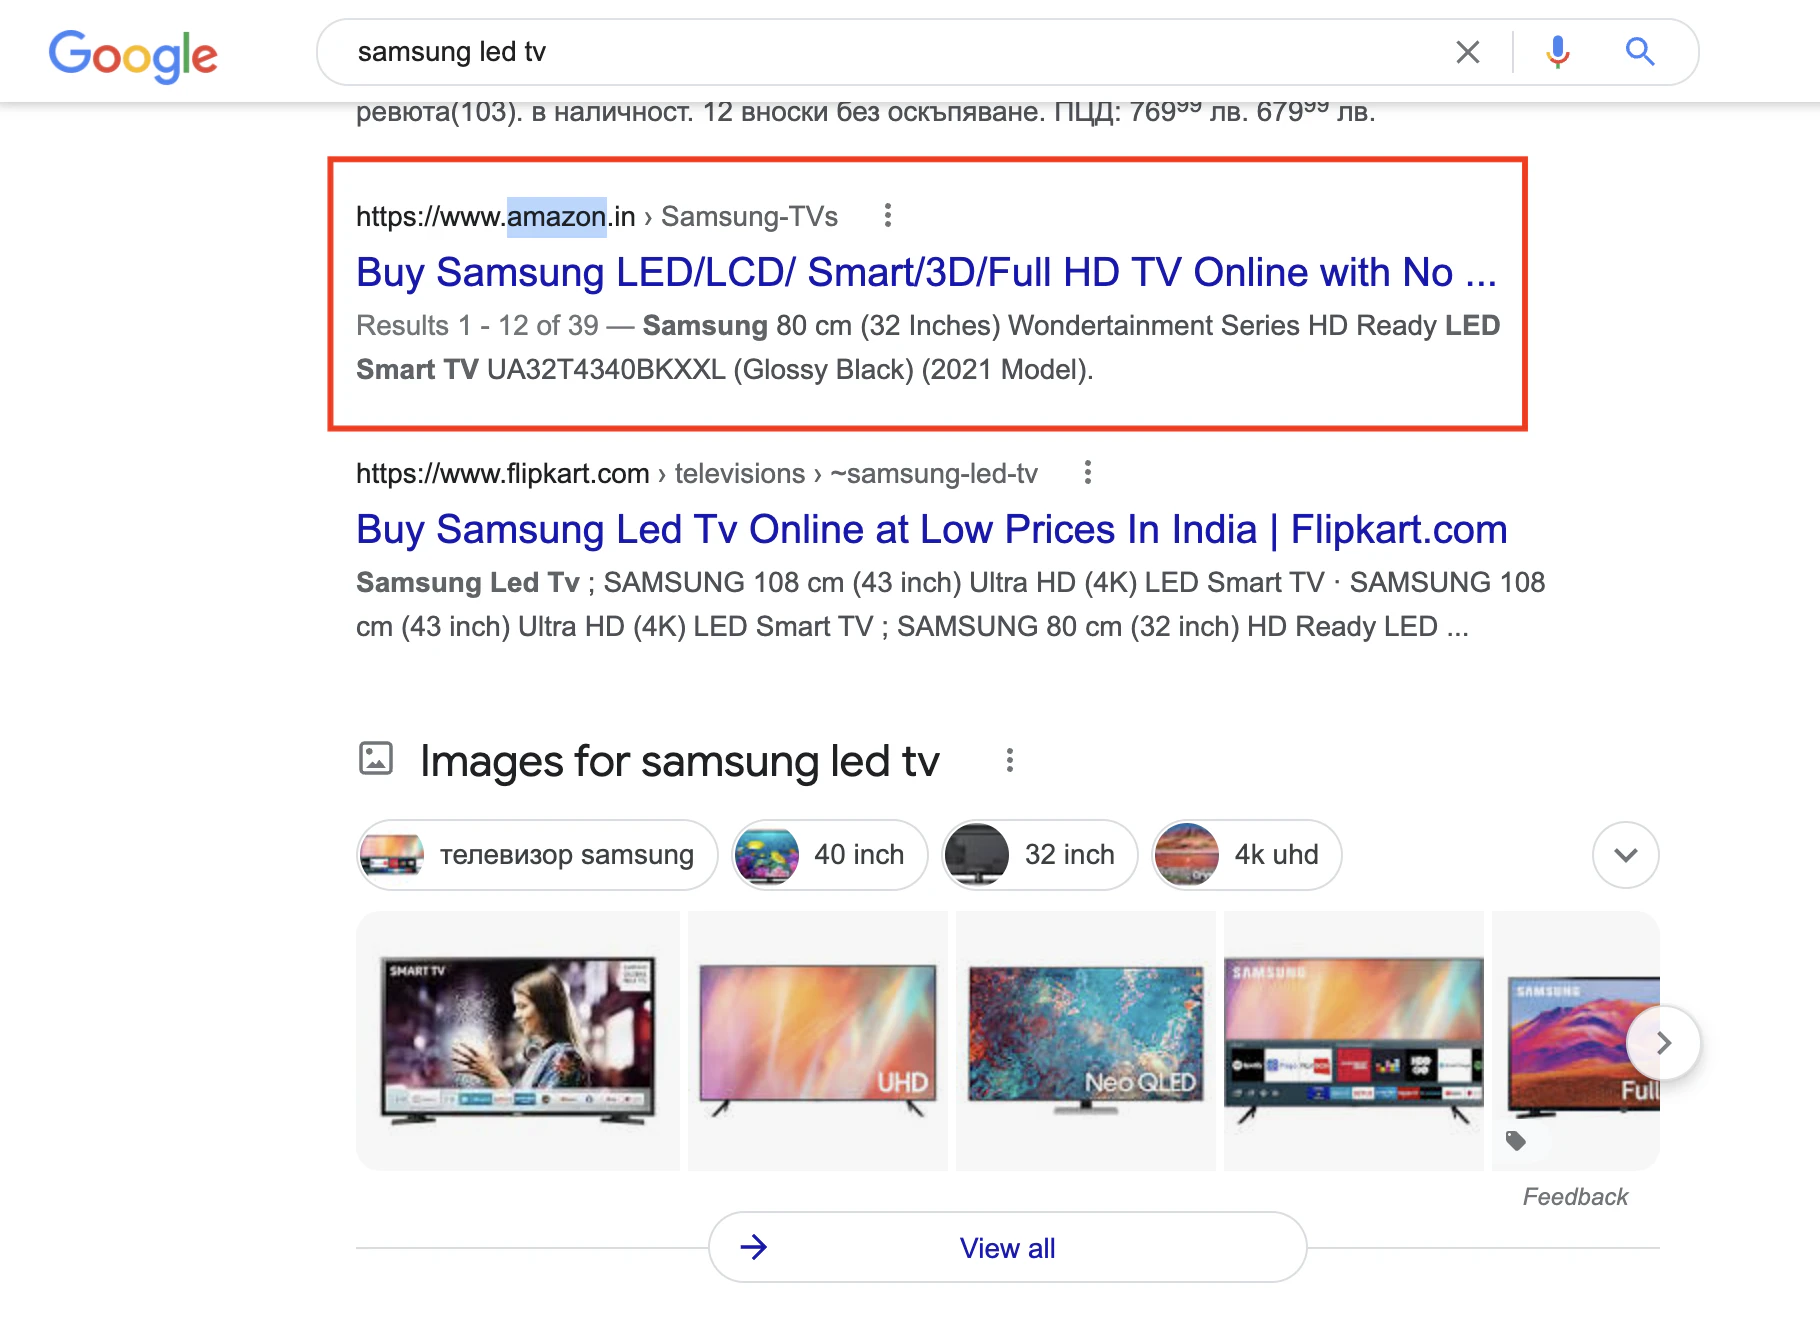
As you can see in the example, Amazon uses the first words in your title in your URL, which will help it show in the Google results.
There are strong parallels between Google SEO and Amazon SEO. Optimizing your product titles and URLs with relevant keywords is a proven strategy for both platforms, as keyword placement and research are important ranking signals for higher visibility in search results.
Amazon allows you to list variations of your products on the same listing. You may have heard this referred to as a parent/child listing.
So, say you sell scented candles. You can create a parent listing where each scent is presented as an option (or a child listing).
The benefit of using child listings instead of individual listings is that you effectively combine the results of all variations. One best-selling scent would lift all variations and likely generate additional sales of each scent you wouldn’t have gotten otherwise.
If you don’t have product variations, but you have products that compliment your best-selling product, you could also create product bundles to tap into the power of your bestseller listing.
Amazon Listing Optimization Tools
If you’re trying to optimize your Amazon listing on your own, there are tools to help. Below we’ll quickly cover two of the most comprehensive optimization tools available.
Helium 10

Helium 10 is an Amazon seller favorite. When it comes to listing optimization, Helium 10 offers a range of tools, including:
- Keyword Processor
- Listing Optimizer
- Keyword Index Checker
- Listing Insights
- Listing Split Testing
Helium 10 starts at $39/month and goes up from there. But not all tools are included in the Starter package, so do your research before committing.
JungleScout

Another tool used by some of the top Amazon sellers is JungleScout. JungleScout’s Listing Builder is its premier tool for listing optimization.
Listing Builder helps sellers to:
- Evaluate where their listings are lacking
- Compare listings to their competitors
- Find relevant keywords that are missing
- Connect directly to Seller Central for updates
But if you want access to the Listing Builder, you’ll have to purchase JungleScout’s $49/month plan.
How to Evaluate What’s Working (and What Isn’t)
When it comes time to optimize, where do you start? You don’t want to make multiple changes all at once because then you can’t track what’s helping or what’s hurting your listing. Instead, you must update your listing one piece at a time. Knowing where to start is as simple as reviewing your metrics.
- Low CTR – A low click-through rate signifies that your product isn’t getting seen or isn’t attractive enough to customers. Focus on optimizing your main product image, title, and pricing.
- High CTR but Low CVR – Clicks but no conversions tell you that customers are unimpressed by your product details. Try updating your bullet points, description, and images with more benefits-driven details. Then, compare your product page to your competitors to evaluate what’s missing.
- Slow start – A slow start on Amazon is hard to overcome without paid advertising. Running PPC campaigns helps you get in front of customers and identify keywords that will get your product organic growth.
- Stalled growth – Was your listing seeing some improvement in sales and ranking, and now it's stuck in the same position? The strategy that gets you from page 10 to page 3 isn’t the same strategy you need to get to page 1. At this point, you need to re-evaluate your keyword performance and, again, utilize Amazon ads to get over the hump.
Once you’ve implemented your changes, give them a couple of weeks to work before adding any new changes.
So, what if you’re mostly satisfied with the performance of your listing? You should schedule listing optimization call with our Amazon marketing team.
Amazon Listing Optimization Template
Now that you know what goes into optimizing your Amazon product listing, it helps to get all the information you need in one place. And we’ve created a template to save you time.
We use this template with our clients to keep track of product details as well as current and potential keywords. You can access our Amazon Listing Optimization template here.
The template will help you quickly:
- Identify what target keywords you’re currently using in your title, backend, bullets, and product description.
- Check that you aren’t using duplicate keywords anywhere in your listing.
- Help you keep an updated list of keywords to test in your product listing next (including a place for search volumes).
- Guarantee you aren’t missing key details in your product listing that could cost you sales.
Understanding the Importance of UPC Codes
UPC codes (Universal Product Codes) are a foundational element for any Amazon seller looking to create a successful product listing. Each product variation—whether it’s a different size, color, or style—requires its own unique UPC code. This isn’t just a formality; providing valid UPC codes ensures your products are correctly identified, categorized, and displayed in Amazon’s search results.
When you create a new product listing, Amazon will prompt you to enter a UPC code. Failing to provide a valid code can lead to your listing being suppressed or even removed, which can seriously impact your sales and account health. Beyond compliance, UPC codes help Amazon’s algorithm understand the relationships between products, making it easier for your items to be found by shoppers searching for similar products.
For Amazon sellers, using accurate and unique UPC codes means your products are more likely to appear in relevant search results, improving visibility and increasing the chances of making more sales. It also helps with inventory management, ensuring that each product is tracked correctly throughout the fulfillment process. In short, UPC codes are not just a technical requirement—they’re a key part of optimizing your Amazon business for growth and success.
Analyzing Competitors Keywords
One of the most effective strategies in Amazon listing optimization is analyzing your competitors’ keywords. By studying the keywords that top-performing listings in your niche are using, you can uncover valuable insights into what’s driving their success. Tools like Helium 10 and Jungle Scout make it easy to extract competitors keywords, giving you a comprehensive list of relevant keywords to target.
Start by identifying the best-selling products in your category and examining their product titles, bullet points, and descriptions. Look for patterns in the keywords they use—these are often the terms that customers are searching for most frequently. By incorporating these relevant keywords into your own product listing, especially in your bullet points and descriptions, you can improve your product’s visibility in search results and attract more potential buyers.
Analyzing competitors’ keywords also helps you spot gaps in the market. If you notice certain relevant keywords that your competitors are missing, you can use these to differentiate your product and capture additional traffic. Ultimately, leveraging competitors keywords is a smart way to refine your Amazon listing optimization strategy, boost your organic ranking, and drive more sales.
Creating Engaging Product Videos
Product videos have become a must-have for Amazon sellers who want to stand out and drive more sales. A compelling product video allows you to highlight key product features, demonstrate how your product works, and showcase its unique benefits—all in a format that’s easy for customers to engage with.
When creating product videos, focus on clarity and value. Show your product in action, emphasize its key features, and explain how it solves your customer’s problems. Keep your videos concise and optimized for mobile devices, as a growing number of Amazon customers shop on their smartphones and tablets. High-quality product videos not only improve product understanding but also build trust and credibility with your audience.
Incorporating product videos into your listings can significantly increase conversion rates and enhance the overall customer experience. Plus, you can use these videos in Amazon advertising campaigns, such as Sponsored Products and Sponsored Brands, to further boost your product’s visibility. By investing in engaging product videos, Amazon sellers can create a more dynamic product listing, connect with shoppers on a deeper level, and ultimately achieve more sales.
Staying Up-to-Date with Amazon’s Latest Trends and Updates
For successful Amazon sellers, staying current with Amazon’s latest trends and updates is non-negotiable. Amazon frequently rolls out new features, updates its algorithms, and changes its policies—all of which can impact your product visibility, sales, and overall account health. To stay ahead, make it a habit to regularly check Seller Central announcements, participate in Amazon webinars, and follow reputable industry blogs.
Joining Amazon seller communities and forums is another great way to stay informed. Networking with other sellers allows you to share knowledge, discuss challenges, and learn about new opportunities as soon as they arise. By keeping up with the latest trends, you can quickly adapt your strategies, optimize your listings, and maintain a competitive edge in the ever-evolving Amazon marketplace.
Being proactive about Amazon’s updates not only helps you avoid potential pitfalls but also positions you to capitalize on emerging trends and product categories. Informed, agile sellers are the ones who consistently outperform the competition and grow their Amazon business year after year.
How Can We Partner with You?
Amazon is constantly changing. If you aren’t working on keeping your listing up to date, you risk losing your standing. But how often do you need to work on optimizing your Amazon listing?
There is no one set answer to this because not only do you need to regularly check and update your listings based on their performance and your current competition, but you also have to watch for any updates to Amazon’s terms, guidelines, or algorithm.
You need to be checking for any performance changes at least weekly and adapting your listing if needed.
When it comes to Amazon changes, try to be proactive if you have the warning instead of reacting after your listing takes a hit.
If you find it too much to keep up with, let us take care of it for you. We’ll look at what you have and develop a custom marketing plan.
We handle not just listing optimization, but keyword research, A/B testing, PPC management, and everything else you need to grow your Amazon business.


.webp)


